
Setting Management
- May 14, 2024
- 8 min read
Updated: Sep 18, 2024
1. Accounting Setting
This screen shows setting basic data relate to Accounting Setting.
Setting => Accounting => UI Accounting Setting.

1.1. Add New Account Book Code
The purpose of this button to create new Account Book Code. UI Accounting Setting => Click button Add new Account Book Code.

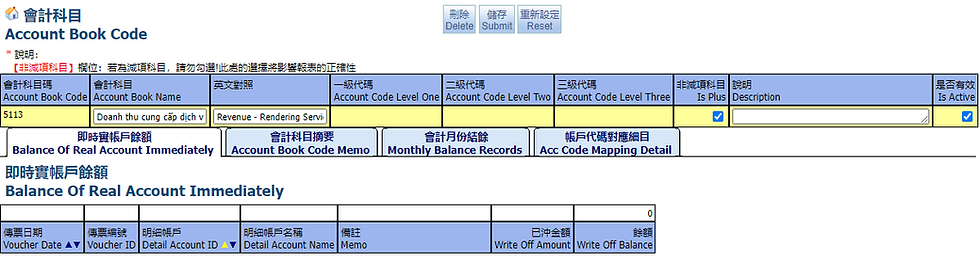
After that, you will see the full screen following. You need fill in the required information and click “Submit” to create new Account Book Code.

Then you will see the screen below
1.2. System Account Code
The purpose of this screen to search Account Book Code follow user’s request

1.2.1. Account Code Tree View
The purpose of this screen to search Account Code Tree View. UI Accounting Setting => Tab Search Account Code => Subtab Account Code Tree View.

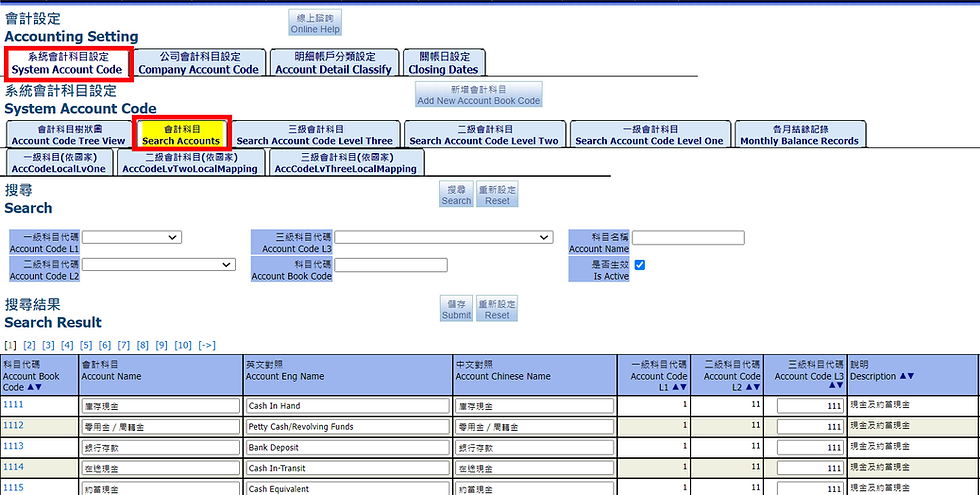
1.2.2. Search Accounts
The purpose of this screen to search Account Code. You can setting information and click Submit to save.
1.2.3. Search Account Code Level Three
The purpose of this screen to search and setting relate to Account Code Level Three

1.2.4. Search Account Code Level Two
The purpose of this screen to search and setting relate to Account Code Level Two

1.2.5. Search Account Code Level One
The purpose of this screen to search and setting relate to Account Code Level One

1.2.6. Monthly Balance Records
In this screen, user can check the current balance of each Account book Code that mean user can know the current period's gain and loss, accumulated profit and other balances according to the accounting period.

1.2.7. AccCodeLocalLvOne
This screen user can see and set the first level of related subjects, according to country

1.2.8. AccCodeLvTwoLocalMapping
This screen user can see and set the second level of related subjects, according to country

1.2.9. AccCodeLvThreeLocalMapping
This screen user can see and set the third level of related subjects, according to country

1.3. Company Account Code
This setting can built up the different accounting book code system according to the company. Therefore, the system is designed for multinational subsidiaries. Currently, it is displayed based on this setting.

Accounting account

Account Code Level 3

Account Code Level 2

Account Code Level 1

Monthly Balance Records

1.4. Account Detail Classify
This tab relate to setting Account Detail Classify. UI Accounting Setting => Tab Account Detail Classify.

1.5. Closing Dates
In this screen, user can set the closing date for each Process type
User fill in Date and click Submit to save.
This function is not currently enabled

2. Voucher Setting Management
This screen shows setting basic data relate to Voucher Setting Management.
Setting => Voucher => UI Voucher Setting Management.

2.1. Voucher Setting Total
Voucher Setting total store all voucher pattern for each Accounting Process. System will base on this to auto create voucher for Accounting Transaction (AccountPayable, AccountReceivable, CustomerPayment, SupplierPayment, BankingTransaction, InventoryTransaction…) thate mean User need set this before create voucher for Accounting transaction

The following introduces the voucher settings for different documents. Generally speaking, only Accounts Receivable, Accounts payable, collection, and payment require accountants to maintain this setting. The other documents have special logic and do not need to be manually created. The Receipts and payments that require manual maintenance are usually manual parts, such as manual accounts receivable (item category = other receivables), manual payables (item category = other payables), manual collections (item category = manual collections), Manual payment (item type = other payments), the following will introduce the instructions starting with Accounts Receivable:
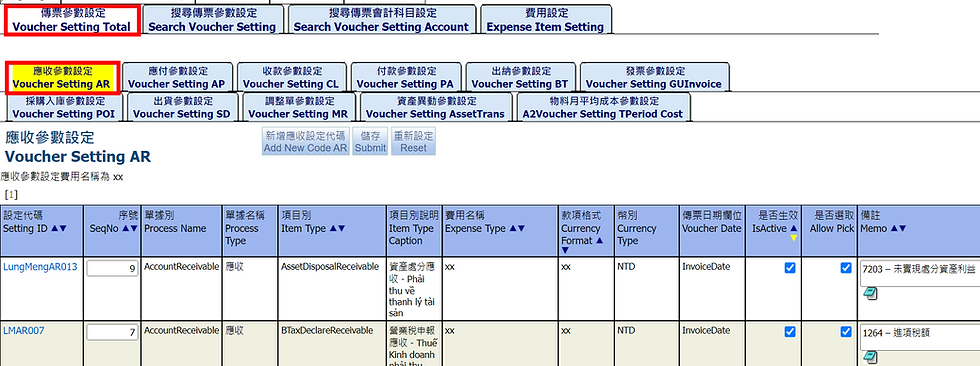
2.1.1. Voucher Setting AR
This tab relates to voucher setting for Account Receivable. UI Voucher Setting Management => Tab Voucher Setting Total => Subtab Voucher Setting AR.
You can add new voucher setting AR by click button “Add New Code AR”

Then, fill in information and click Submit to add

After create successfully, you can setting voucher AR at this screen

In the voucher setting, please pay attention to these fields:
Header of Voucher setting

Process Name: the above picture is AccountReceivable
Payment Format: display the payment Method: Cash, Remit, L/C, Check
Item Type / Item Type Caption: Display the category for each Process Name such as: Goods Payable, Others Payable, Service Payable ….
Expense Name: Displays the account settings corresponding to different expense names. Usually different expense properties define different voucher settings.
Source ItemType / Source Item Type caption: Displays the source document item category corresponding to this voucher setting. Only Customer Payment and Supplier Payment need to be set, because the Customer Payment and Supplier Payment will correspond to the source document receivable or payable document. , Different voucher settings need to be set according to different attributes of the source document. For example, the accounts of payment payable for goods purchases and payment vouchers for expense purchases may need to be divided into accounts payable or other accounts payable.
Currency Type: Displays the document currency corresponding to this voucher setting, because local currency and foreign currency may need to be set differently. For example, the output tax amount needs to be set abroad, while the output tax amount needs to be set domestically.
Is Return: Displays whether the document corresponding to this voucher setting is allowed to be returned. Only Customer Payment and Supplier Payment need to be set.
Is Active: it is used to defined this voucher setting can generate voucher or not. That mean it can be used to disable or enable the voucher setting
Allow pick: Shows whether this voucher setting can be selected. In the accounts payable and payment documents, there will be a function to select the voucher settings to add new items. The selected items must be checked or not.
Voucher Setting Item

Fields in the right:

Is Display Invoice: When displaying this subpoena, it is necessary to display the invoice number in the subpoena report.
Role Name: Displays the classification corresponding to this accounting account. This classification usually affects the rules for calculating amounts.
Account Book Code
Debit / Credit
Detail Account Classify: Select the classification to be displayed for this account, such as displaying customers, suppliers or bank accounts
The function of the expense name will be further explained below. Taking other accounts receivable as an example, this is manual accounts receivable. There may be different expense accounts, so different expense names can be filled in to create different voucher account settings.


Other settings are source documents, such as GoodsReceivable (source shipper), and there is no need to manually edit the expense name.

The system will bring the account book code set based on the materials into the voucher, so the credit account in the voucher settings displays the account parameters defined by the system, and the debit side still needs to fill in the specific account

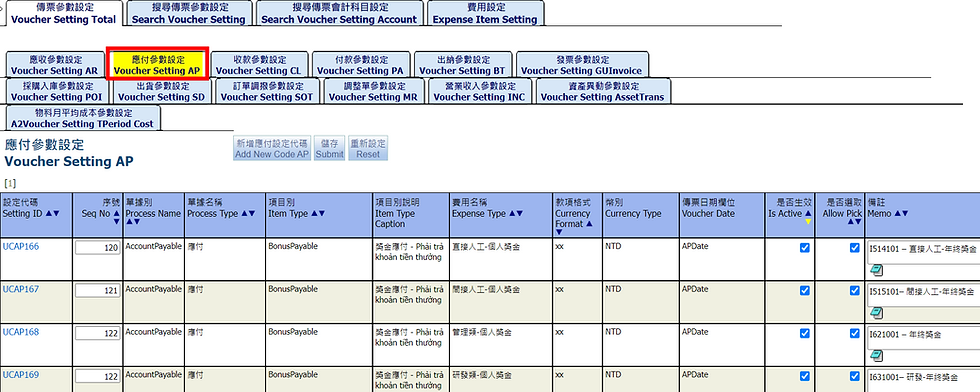
2.1.2. Voucher Setting AP
This tab relates to voucher setting for Account Payable. UI Voucher Setting Management => Tab Voucher Setting Total => Subtab Voucher Setting AP.
You can add new voucher setting AP by click button “Add New Code AP”

Then, fill in information and choose “Sub Item Type” and click Submit to add

After create successfully, you can setting voucher AP at this screen

2.1.3. Voucher Setting CL
This tab relates to voucher setting for Collection. UI Voucher Setting Management => Tab Voucher Setting Total => Subtab Voucher Setting CL.
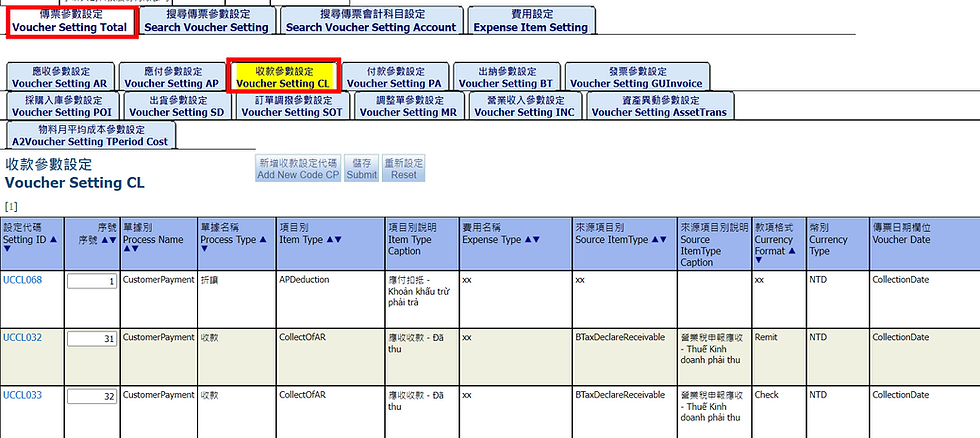
You can add new voucher setting CL by click button “Add New Code CP”

Then, fill in information and choose “Sub Item Type” and “Currency Type” and click Submit to add

After create successfully, you can setting voucher CL at this screen

2.1.4. Voucher Setting PA
This tab relates to voucher setting for Payment. UI Voucher Setting Management => Tab Voucher Setting Total => Subtab Voucher Setting PA. You can add new voucher setting PA by click button “Add New Code SP”.

Then, fill in information and choose “Sub Item Type” and “Currency Type” and click Submit to add

After create successfully, you can setting voucher PA at this screen

The voucher settings of the following nature have usually been set up with the help of back-end personnel. Because there may be special logic that needs to be processed, they are only briefly introduced.
2.1.5. Voucher Setting BT
This tab relates to voucher setting for Banking Transaction. UI Voucher Setting Management => Tab Voucher Setting Total => Subtab Voucher Setting BT. You can add new voucher setting for Banking Transaction by click button “Add New Code BT”.

Then, fill in information and choose “Process Type” and click Submit to add

After create successfully, you can setting voucher for Banking Transaction at this screen

2.1.6. Voucher Setting GUInvoice
This tab relates to voucher setting for GUInvoice. UI Voucher Setting Management => Tab Voucher Setting Total => Subtab Voucher Setting GUInvoice. You can add new voucher setting for GUInvoice by click button “Add New Code GUInvoice”.

Then, fill in information and click Submit to add

After create successfully, you can setting voucher for GUInvoice at this screen

2.1.7. Voucher Setting POI
This tab relates to voucher setting for PO Receiving (PI). UI Voucher Setting Management => Tab Voucher Setting Total => Subtab Voucher Setting POI. You can add new voucher setting for PO Receiving by click button “Add New Code POI”.

Then, fill in information and click Submit to add

After create successfully, you can setting voucher for PO Receiving at this screen:

2.1.8. Voucher Setting SD
This tab relates to voucher setting for Order Shipping (SD). UI Voucher Setting Management => Tab Voucher Setting Total => Subtab Voucher Setting SD. You can add new voucher setting SD by click button “Add New Code SD”.

Then, fill in information and click Submit to add

After create successfully, you can setting voucher SD at this screen

2.1.9. Voucher Setting MR
This tab relates to voucher setting for Adjustment. UI Voucher Setting Management => Tab Voucher Setting Total => Subtab Voucher Setting MR. You can add new voucher setting MR by click button “Add New Code MR”.

Then, fill in information and click Submit to add

After create successfully, you can setting voucher MR at this screen.

2.1.10. Voucher Setting AssetTrans
This tab relates to voucher setting for Asset Transaction. UI Voucher Setting Management => Tab Voucher Setting Total => Subtab Voucher Setting AssetTrans. You can add new voucher setting Asset Transaction by click button “Add New Code AssetTrans”.

2.1.11. Voucher Setting TPeriod Cost
Click "Add New Code TPeriod Cost" to add material monthly average voucher settings.

2.2. Search Voucher Setting
This tab is used to search voucher setting

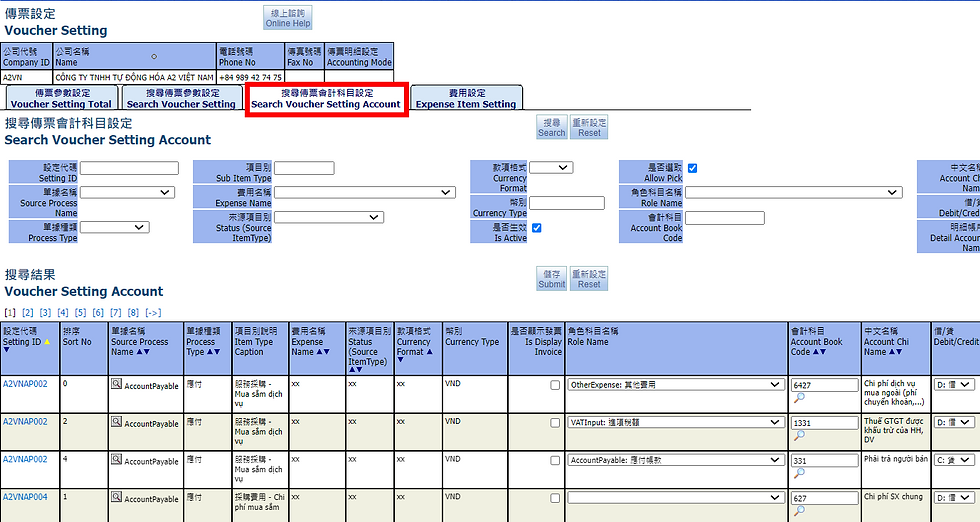
2.3. Search Voucher Setting Account
This tab is used to search voucher setting account
2.4. Expense Item Setting
User can see the expense names and currencies of receivables, payables, collections, and payment documents. Only voucher settings have expense names are displayed.

2.4.1. Expense Item AR
This screen display The expense name and currency of Voucher setting for Account Receivable

2.4.2. Expense Item CP
This screen display The expense name and currency of Voucher setting for Customer Payment

2.4.3. Expense Item AP
This screen display The expense name and currency of Voucher setting for Account Payable

2.4.4. Expense Item PA
This screen display The expense name and currency of Voucher setting for Supplier Payment

3. Company Information
This screen shows setting basic data relate to Company Information. Setting => Company => UI Company Information.

3.1. Company Info
This tab relates to company information. UI Company Information => Tab Company Info.

In this tab you can upload the file if need

The following is the commonly functions used by managers and employees :
In this screen, user can set Midtype and Subtype for InventoryItem. Almost setting are stable and can not be changed, user can only set IsActive to define it enable or disable.

User can enter the Item Group to add MidType or enter the Midtype to add the Subtype. Example Add MidType for Product


After adding it, you need to go to Items Mid-type to add this new addition.


In Item Midtype Tab, user can set Item Flow type, Income Item Type, Expense Item Type. Etc. This setting is related to the automatic generation of Account Receivable, related to Account Payable or voucher setting

To change the name of Item Mid-type, click to Rename

There are the same special settings in the Items Sub-Type, so the method of adding Items Sub-Type can refer to the middle classification.
3.3. Company Setting
This screen display all setting relate to company’s ERP system

Example: Unit Setting


3.4. Workflow Setting
In this screen user can set up all document approval processes, including document permission settings.

For example, the manual Workflow process setting of Account Receivable


The workflow process can be edited in tab Action settings.
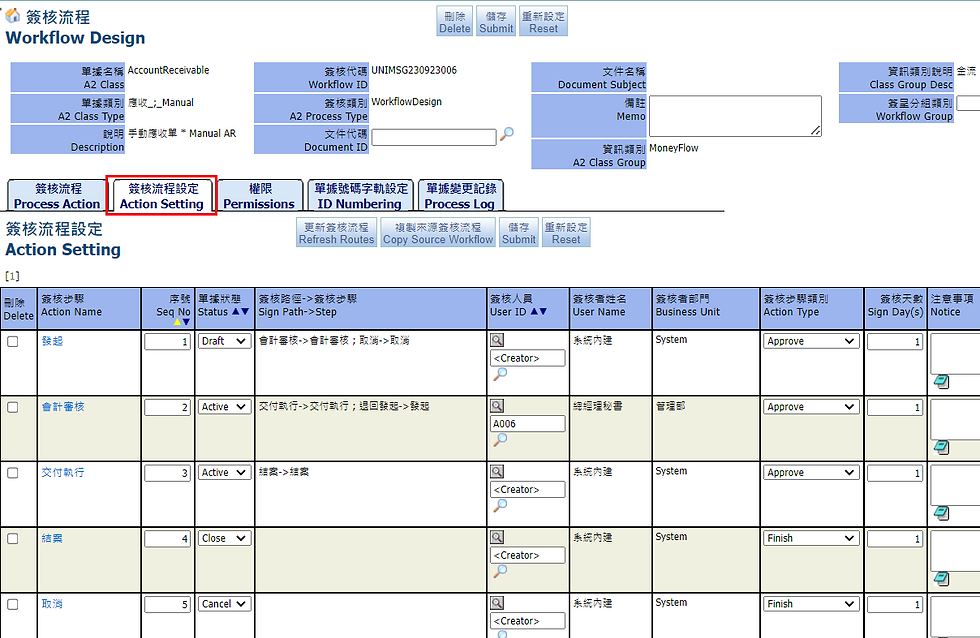
After finish editing, click button “Refresh Route”

In Permissions tab, user can set the user groups that have permissions for this document.

End.