
Document Management
- May 17, 2024
- 4 min read
Updated: Jul 8, 2024
Home page => Manage => Document => UI Document Management

1. Customer Document
1.1. Add Customer Document
The purpose of this button to create new Customer Document. UI Document Management => Click button Add Customer Document

After that, you will see the full screen following. You need fill in the required information and click “Submit” to create new Customer Document.

Then you will see the screen below

1.2. Edit
After create successfully Customer Document, on the top of this screen, you see some buttons as Delete, Auto Commit, Submit, Reset.
Click button Delete to delete document. Click button Submit to save after adjusting and changing data. If you sign next step from Draft to Active, click button Auto Commit.

1.2.1. Related Files
In this tab you can upload the file if need

1.2.2. Download Log
This screen shows members who download files

1.2.3. Related Projects
This tab shows related Projects

And you also can add other projects at tab “Add Project”. Pick choose project and click “Submit Items” to add.

1.2.4. Related Items
This tab shows related Items

And you also can add other items at tab “Add Items”. Pick choose item and click “Submit Items” to add.

1.2.5. Message Links
This tab is used to add message link. You can fill in link URL and click Submit to save

1.2.6. Petition
This screen shows related Petition. Add Petition: this button is used to create related Petition for document.

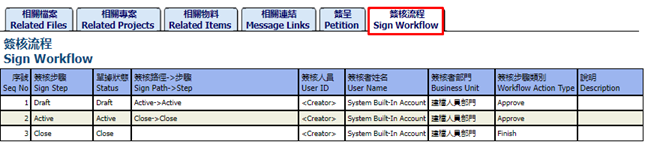
1.2.7. Sign Workflow
This screen shows related workflow
1.3. Active Customer Document
The purpose of this screen to search data relate Customer Document status Active.
UI Document Management => Tab Customer Document => Subtab Active Customer Document.

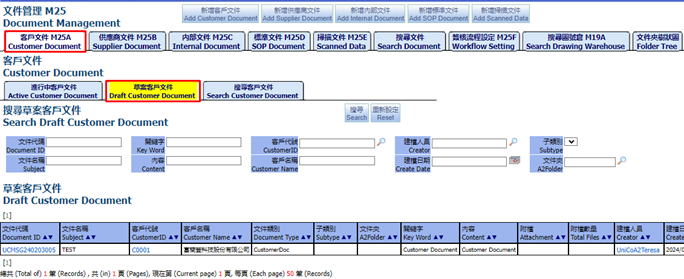
1.4. Draft Customer Document
The purpose of this screen to search data relate Customer Document status Draft.
UI Document Management => Tab Customer Document => Subtab Draft Customer Document.
1.5. Search Customer Document
The purpose of this screen to search data relate Customer Document.
UI Document Management => Tab Customer Document => Subtab Search Customer Document.

2. Supplier Document
2.1. Add Supplier Document
The purpose of this button to create new Supplier Document. UI Document Management => Click button Add Supplier Document.

After that, you will see the full screen following. You need fill in the required information and click “Submit” to create new Supplier Document.

Then you will see the screen below

2.2. Active Supplier Document
The purpose of this screen to search data relate Supplier Document status Active. UI Document Management => Tab Supplier Document => Subtab Active Supplier Document.

2.3. Draft Supplier Document
The purpose of this screen to search data relate Supplier Document status Draft. UI Document Management => Tab Supplier Document => Subtab Draft Supplier Document.

2.4. Search Supplier Document
The purpose of this screen to search data relate Supplier Document. UI Document Management => Tab Supplier Document => Subtab Search Supplier Document.

3. Internal Document
3.1. Add Internal Document
The purpose of this button to create new Internal Document. UI Document Management => Click button Add Internal Document.

After that, you will see the full screen following. You need fill in the required information and click “Submit” to create new Internal Document.

Then you will see the screen below

3.2. Active Internal Document
The purpose of this screen to search data relate Internal Document status Active. UI Document Management => Tab Internal Document => Subtab Active Internal Document.

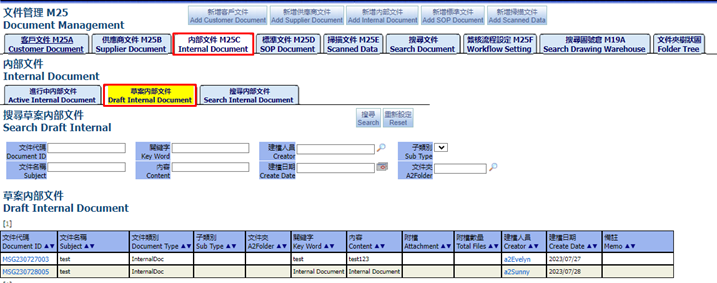
3.3. Draft Internal Document
The purpose of this screen to search data relate Internal Document status Draft
3.4. Search Internal Document
The purpose of this screen to search data relate Internal Document

4. SOP Document
4.1. Add SOP Document
The purpose of this button to create new SOP Document. UI Document Management => Click button Add SOP Document.

After that, you will see the full screen following. You need fill in the required information and click “Submit” to create new SOP Document.

Then you will see the screen below

4.2. Active SOP Document
The purpose of this screen to search data relate SOP Document status Active. UI Document Management => Tab SOP Document => Subtab Active SOP Document.

4.3. Draft SOP Document
The purpose of this screen to search data relate SOP Document status Draft

4.4. Search SOP Document
The purpose of this screen to search data relate SOP Document

5. Scanned Data
5.1. Add Scanned Data
The purpose of this button to create new Scanned Data. UI Document Management => Click button Add Scanned Data.

After that, you will see the full screen following. You need fill in the required information and click “Submit” to create new Scanned Data.

Then you will see the screen below

5.2. Active Scanned Data
The purpose of this screen to search data relate Scanned Document status Active. UI Document Management => Tab Scanned Document => Subtab Active Scanned Document.

5.3. Draft Scanned Data
The purpose of this screen to search data relate Scanned Document status Draft.

5.4. Search Scanned Data
The purpose of this screen to search data relate Scanned Document

6. Search Document
This screen is to search all different categories and statuses of documents

7. Workflow Setting
The purpose of this screen to search data relate workflow setting

8. Search Drawing Warehouse
This tab is used to search drawing warehouse

9. Folder Tree
This tab is used to search folder tree

End.