Production Management
- May 28, 2024
- 4 min read
Updated: Oct 15, 2024
Go to Operation, in the drop down list, choose Production Management.
Or you can us the button “Go to Production Management” in home page.
The Production Management Module is used to control user shift online and offline, machine job online and offline, and responsibility of machine exception. This is system screens.
1. Mobile Scanning
In this screen, we can use mobile app to scan to create po receiving, shipping and transfer transaction.
1.1. Download Barcode Scanner APP
Use url to download or search “Barcode Scanner” in Play Store
Only Android can download the APP
Open the APP, click ”Setting” in the upper right corner, find “Custom search URL” in the setting screen and click in
Enter the following url and change [Domain Name] to correct url, click in define
URL: http://[Domain Name]/?A2ProcessName=Production&QRCode=%s
1.2. Mobile Scanning – Scanned List
Click “Production Management” in Operation to enter the Mobile Scanning screen
First time use “Mobile Scanning” need to click “Create Shopping Cart” to create shopping cart.
Use Barcode Scanner APP scan Material Label, MO Adjustment reports QRcode, click “Custom search” to enter system
Scan successfully, inventory item will be displayed in Scanned List
Scan ItemNo, ItemType= InventoryItem, scan BatchNo, ItemType=BatchNo
If want to delete inventory item, please delete it in Scanned List
You can click order id to enter shopping cart confirm information
1.3. Mobile Scanning – PO Receiving Scanned
Express PO Receiving screen display all PO for item, pick up need create PI’s PO, and input qty in field Receiving Qty, clcick “Create PO Recive Trans”
*PO Receiving Scanned only display item with ItemType = InventoryItem
After PI create successfully, system will jump to “Recent Transaction”
*Use PO Receiving Scanned to create PI, system will auto sign to close
When finish created transaction, system will auto delete all inventory item in Scanned List, need scan again
1.4. Mobile Scanned – Shipping Scanned
Shipping Scanned screen display all SA for item batch no, pick up need create SD’s SA, and intput qty in field Shipping Quantity, click “Create Shipping Trans”.
Shipping Scanned only display item with ItemType = BatchNo
After create SD successfully, system will jump to “Recent Transaction”
Use Shipping Scanned to create SD, system will auto sign to close
1.5. Mobile Scanning – Manual Transfer Scanned
In Transaction Setting choose transaction type and target warehouse, then submit and click “Create Transaction” or “Create Transaction And Commit”
Manual Transfer Scanned only display item with ItemType = BatchNo
Note:
Create Transaction button: it’s create status = Draft transaction
Create Transaction And Commit button: it’s create transaction and auto sign to close
After create transaction successfully, system will jump to “Draft Transaction”
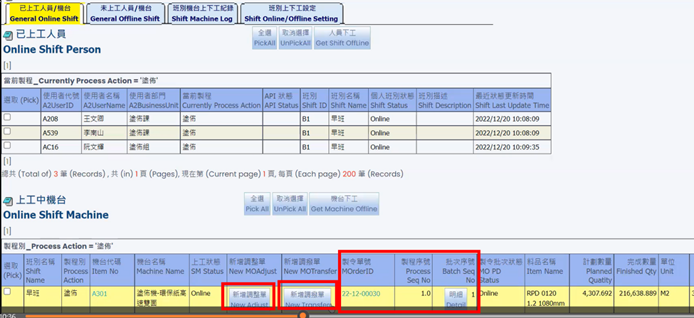
You can get personal shift online or offline at this tab, make sure you’re exist in one shift and process action, if you don’t belong to any shift or process action then need to set first
Then you can get personal online or shift online
Go to sub tab Add Online Shift Machine to get machine online
Now your shift and machine are online already, you can see the Active jobs below. You can create MO Transfer or MO Adjustment in this screen directly.
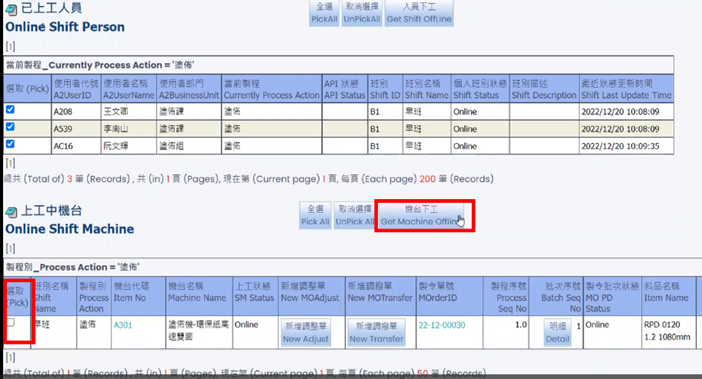
After daily job finished you can get personal offline or shift offline, and get machine offline.
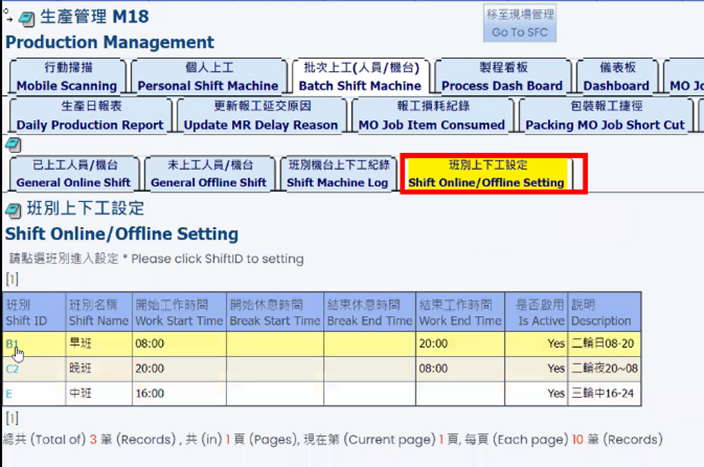
In this tab you can set all member shift and process action. Click any shift to set.
Go to tab Shift Member Setting then add new member.
When add new member you must pick user and select process action to add.
If you want to delete process member then you can pick user then click remove members.
In Batch Shift Machine you can add multiple members to online.
Go to General Offline Shift and pick user’s to get shift online.
Then go to below to add machine to online.
After you can see members and machines online at tab General Online Shift.
Click machine to get jobs online.
In tab Online Job, there is only allow one job status is online, you need to pick from active jobs.
You can see we pick job online.
If you need to roll back job to active or sign to close, just pick job then click buttons.
After that, you can see machine display related online job, then you can create MO Transfer or MO Adjustment in this screen directly.
When daily jobs finish, you can get shift offline, if all member offline then all machine will offline too.
You can also pick machine offline manually first.
4. Process Dash Board
This tab is to search details of process batches in Manufacture orders. Select “Process Action” then click Search to find.
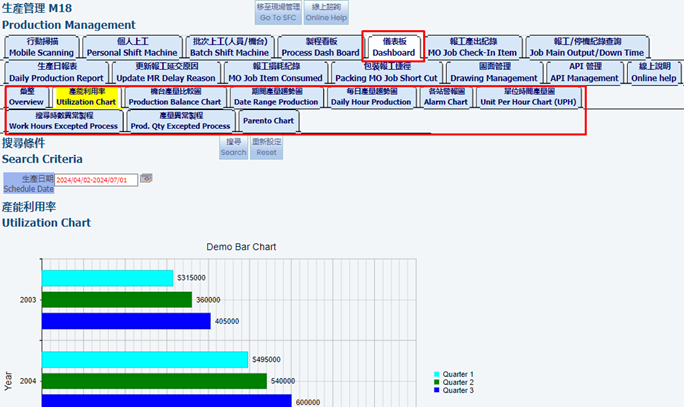
5. Dashboard
Demo charts for production.
6. MO Job Check-In Item
6.1. MO Job Check-In Item
This screen to search InventoryTransaction Transaction type = MOAdjustment
This screen to search InventoryTransaction Transaction type = MOAdjustment in the period have not closed and User can change infos such as Labor Time, Production Time, Description, Memo
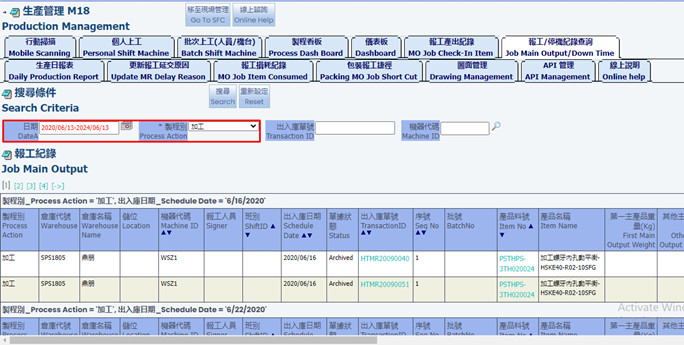
7. Job Maine/Output Down Time
This screen to search InventoryTransaction Transaction type = MOAdjustment and Detail of Production Down Time base on DateA and ProcessAction
8. Daily Production Report
This report will show machine daily production and related machine down hours and reason.
9. Update MR Delay Reason
You can update MO adjustment delay reason in this tab.
10. MO Job Consumed
In this tab, you can see the MO Adjustment check-out journal records.
In this tab you can pick any semi-product to auto create packing transfer and adjustment. The semi-product must exist available stock.
12. Drawing Management
Search Drawing No
This tab is to search drawing of production items.
You can check Drawing No in product screen
Print Drawing No
13. API Management
14. Online help
On this screen, you can view online documents or help content. If you need to upload files, you need to enter the setting page of the approval process.
End.


