Includes the management of various material types, such as products, services, materials. It is easy to check inventory transaction and delivery records.
1. Create new inventory item
After opening pages Inventory Management, click on the material type that needs to be added, such as adding a new product, and click “Add New Product” on the product page.
In the new window opens, all item add new screen are very same, you can refer to add new product first, filling necessary information to create a new item code.
Inventory Item No: You delete system's default code and instead of your company code
Inventory Item Name: Fill in Item Name
Version: Default value = 1
Inventory Type: This example is defaulted to Product and cannot be changed
Inventory Status: Defeault as Active
Unit: Choose unit of new item
Subtype: Choose subtype for new items cause it will affect subtype and item flow type
Item Flow Type: get from chooise subtype, if empty then you need to choose manually
Is PO Request: default as MO
Warehouse: select warehouse for this item.
Description: You can fill in any description or memo for this new item
Petition ID: will automatically link Inventory Item No and the Petition ID after creation
When you choose subtype, it will automatically bring in item flow type. If Item Flow Type is blank, must use magnifying glass to select
In this case, if empty item flow type is empty then you need to choose manually
Base on Item Flow Type description to choose correct option
None: No Stock and Cost Management
Tangible/Asset: Only do Stock Management, no Cost Management
Accountable: Need to do both Stock and Cost Management
If subtype or midtype define item flow type already then just choose it, system will auto bring item flow type.
Item flow type will affect if this new item is tangible item, only tangible item can create
transaction. Click submit when finish.
System will open new screen of item
2. Item Edit
Open item edit screen that you want to set up the information (click on that item code), you attend to areas that circled in red as shown.
System will open item edit screen; you can copy, delete, and save data at header
2.1. Product Information
Pull down you see subtabs:
SA Record: display SAs order of this item, order status and order quantity
The other subtabs such as purchase records, inquiry records, quotation records, etc. are related documents that relates to this product code
2.2. Costing/Pricing
Item Process/Item Process Formula
In this screen, you can set relevant customers or suppliers, and establish the production planning process and material formula of the material.
Based on this, the manufacturing process and formula will be subsequently generated. The process type must be filled in, and each process must have Input and output materials
You can add customer ID or supplier ID below to link with this item and fill in the price and standard cost so that you can use it as a common price when adding new orders or purchase orders in the future.
Next is to create a new route for manufacture process
Or you can copy from other product's processes. Using this function will delete the current routes and fomula, and enter source item no and process seqno that need to be copied.
If you need to delete the process at once, you can use "Remove Item Process"
After setting each process machine, you can use button "Load to InvAvaMachine" for the process, because scheduling is based on available machine settings.
After loading, click button "Detail" to view the available machines for the process, and you can continue to add more available machines
Next, you need to create a material formula, click on "detail" in Process Action
Recipes can be added at this tab, there must be at least one input and output material. The output material of this process must be the same with the input material of next process.
Back to previous screen to view Item Process Formula
The final cost of this product can be calculated based on the theoretical material and labor costs (input costs and manufacturing costs).

2.3. LCA Routing

2.3.1. LCA Routing
This tab shows the LCA Process Action and LCA Progress Formula of the inventory, and set Standard Emission Factor

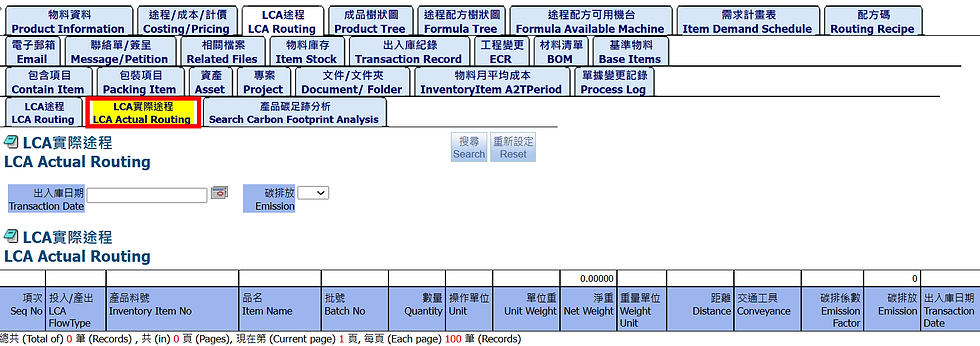
2.3.2. LCA Actual Routing
This tab shows the actual process action of LCA
2.3.3. Search Carbon Footprint Analysis
This tab shows the related carbon emissions with this inventory

2.4. Product Tree
This screen display will display product code used as the material put into production according to the created process.
For example, if a semi-finished product is an input to create a finished product; then the finished product tree of the semi-finished product will display the finished product number.
If there is no data, please click "Recreate Tree View" to generate a tree diagram
2.5. Formula Tree
This screen will display the input materials related to this item according to the created route.
For example, if a semi-finished product is input to produce a finished product, the route formula tree view of the finished product will display the semi-finished product code and the input materials of the semi-finished product.
If there is no data, please click "Recreate Tree View" to generate a tree diagram
Demand details show the MRP demand for formula materials in the process tree diagram
Basic tree view details are used to view the original expanded data
2.6. Formula Available Machine
In this screen, the available machines for each material in the route formula will be displayed based on the created route, to comprehensively consider the production status of each production line.
If there is no data, please click to generate a tree diagram first.
2.7. Item Demand Schedule
In this screen, you can see the current accumulated MRP demand for this material based on different demand sources.
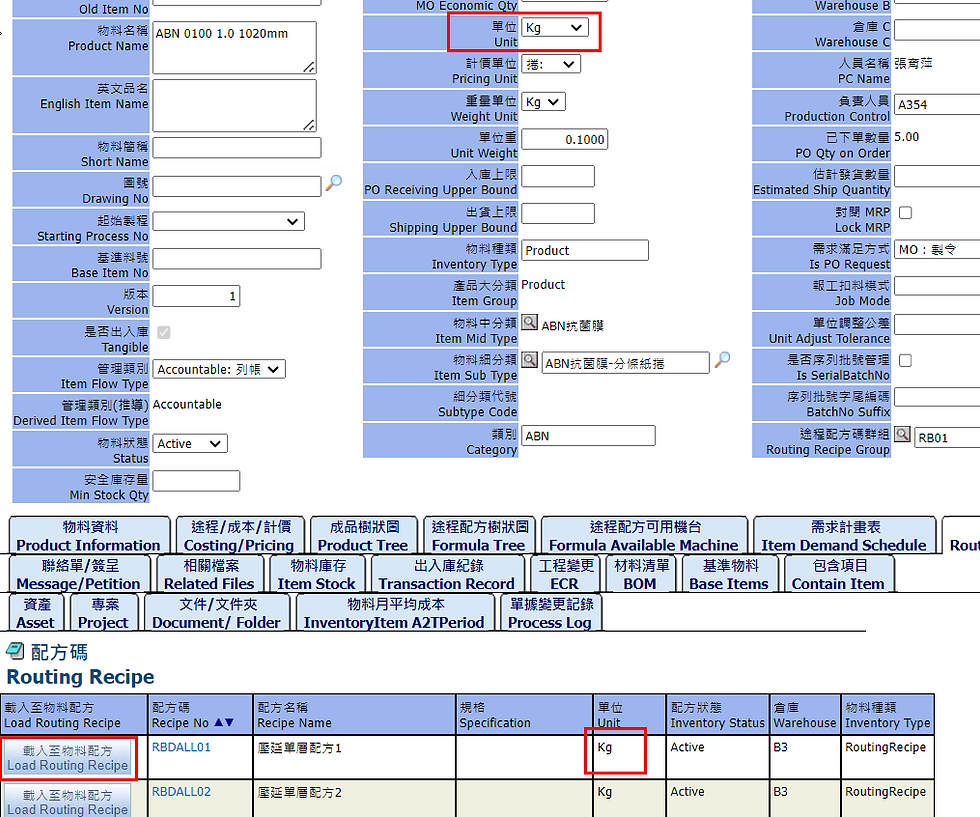
2.8. Routing Recipe
This screen allows you to search for formula codes that can be used for this material.
The recipe code needs to be based on the routing recipe group specified by the single head in order to bring in the recipe code of this group.
Only after selecting the routing recipe group, the available recipe codes can be displayed.
Here you can load the available formula codes into the material route formula as input materials, but they must be in the same unit before load.
For example, if the material unit is M2 and the formula code unit is Kg, it cannot be loaded.
If the units are the same, all input formulas of the formula code will be brought into the product.
2.9. Email
Related emails can be viewed on this tab
2.10. Message/Petition
In this screen, you can create related messages and submission documents, and link and track this material.
2.11. Related Files
In Related Files page, you can attach the file related to this item, such as quotations of suppliers…
2.12. Item Stock
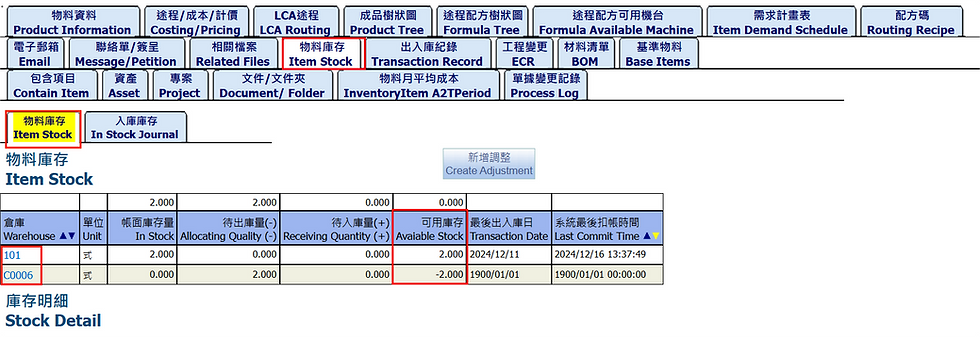
Item Stock
At Item Stock, you can see quantity of this item in each warehouse, cause the considering code only have inventory stock in a warehouse, so you only see a warehouse.
Allocated Quantity: show quantity of pending inventory (MR for warehouse export or TO for distribution ... in draft status)
Receiving Quantity: quantity for warehouse import (PO receiving in draft status)
In Stock: show quantity of current inventory
Available Stock: show quantity after deducting "Quantity waiting to export”
Stock Detail
Can view inventory details, such as batch number, storage location, etc.
MO Request
Display the unproduced quantity of relevant orders.
Planned Quantity: the quantity required during production
Journal Quantity: quantity of materials produced
Unclosed Transactions
In this area you can check un-close transactions for allocated quantity and receiving quantity.
In Stock Journal
In this tab, you can view source receipt transactions of the inventory
2.13. Transaction Record
Item Transaction
In search Inventory Transaction page, you will find all transaction related to this item, press the Search button to display all, or can be found under criteria described out below.
The results will be sorted default by confirmed date, you note when creating inventory transaction obey order time.
MO Adjust JPlan
In this tab you can check this item related MO Adjustment.
Archived Item Transaction
In this tab you can check archived transactions. When the amount of data is too large, the system will store part of the historical data in the archive area to speed up normal data query operations.
2.14. ECR
In this tab, you can check or create new ECR
2.15. BOM
In this tab you can check item BOM (bill of material), it get from current item process formula items, but it cannot display all related input items, if you need to check all related input items then you need to go to tab Formula Tree
2.16. Base Items
In this tab you can check all items setting BaseItemNo are same as current item
2.17. Contain Item
In this tab you cab check contain item, the create logic like BOM, you can manually fill in data too.
2.18. Asset
In this tab you can check and create item related serialitem.
2.19. Project
In this tab, display related project, you can create related project.
2.20. Document/ Folder
Document
In this tab, it displays documents relate to product code.
Add Document
You can add an existing document to create a link between this item and the document.
Item Document & Files List Report
In this tab, you can print document lists relates to item.
Folder
In this tab, you can check folders that relate to this item.
2.21. InventoryItem A2TPeriod
On this screen, you can view the average monthly cost of this material.
2.22. Process Log
In this tab you can check this item data change log.
Below we will introduce Inventory Management tabs.
3. Inventory Management
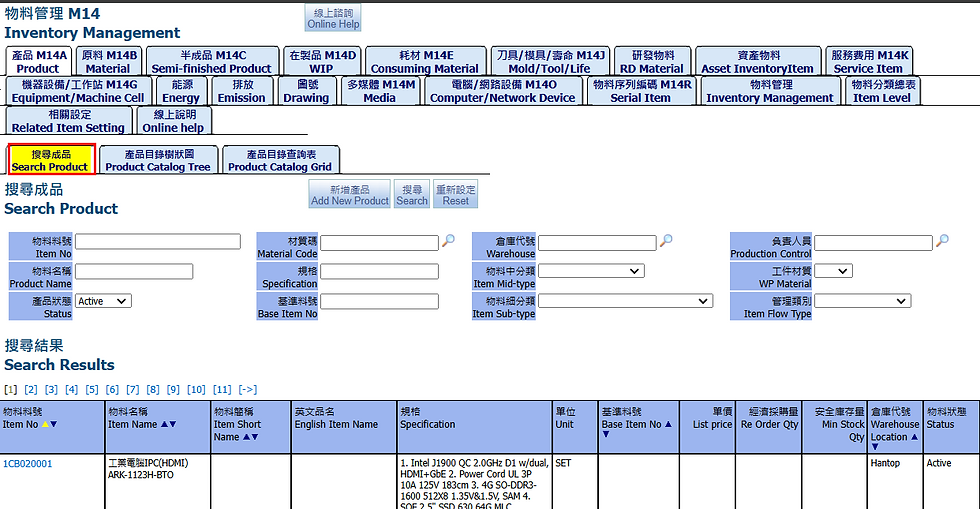
3.1. Product
3.1.1 Search Product
This tab is to add and search products
3.1.2 Product Catalog Tree
3.1.3 Product Catalog Grid
3.2. Material
This tab is to add and search raw materials.
This screen is for printing raw material labels. You can convert the material code and item name of each raw material into a label for printing. After the report file is createdd, you can see the 2D barcode on the label.
3.3. Semi-finished Product
This tab is to add and search semi-finished products.
3.4. WIP
This tab is to add and search WIP items.

3.5. Consuming Material
This tab is to add and search comsuming items
3.6. Mold/Tool/Life
This screen allows you to add new tools and molds and query related service life
3.6.1. Mold/Tool
This tab is to search and add new mold/ tool.
You can search based on Tool/Mold material specifications
Add Tool/Mold Material Spec.
You can go to the tab “Related Item Setting” to add, click Setting Name “ToolMaterialSpec ” and enter the setting screen

Fill in the “Tool/Mold Material Spec” and Click submit to add

Tool/Mold Material Spec have been added

Add New Tool/Mold
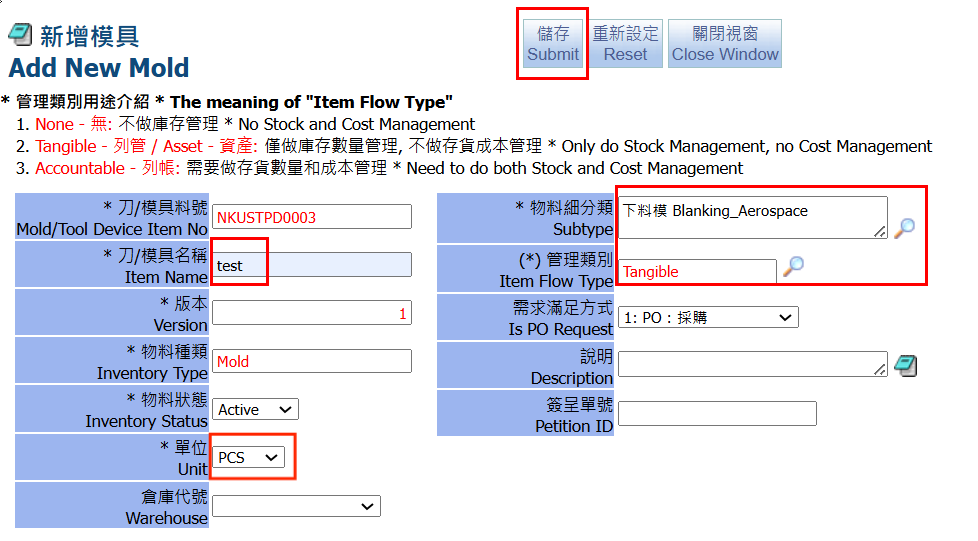
This screen you can add new tool and mold, taking the mold as an example, click the button "Add New Mold"

Fill in the following information, * is required, click submit when finish
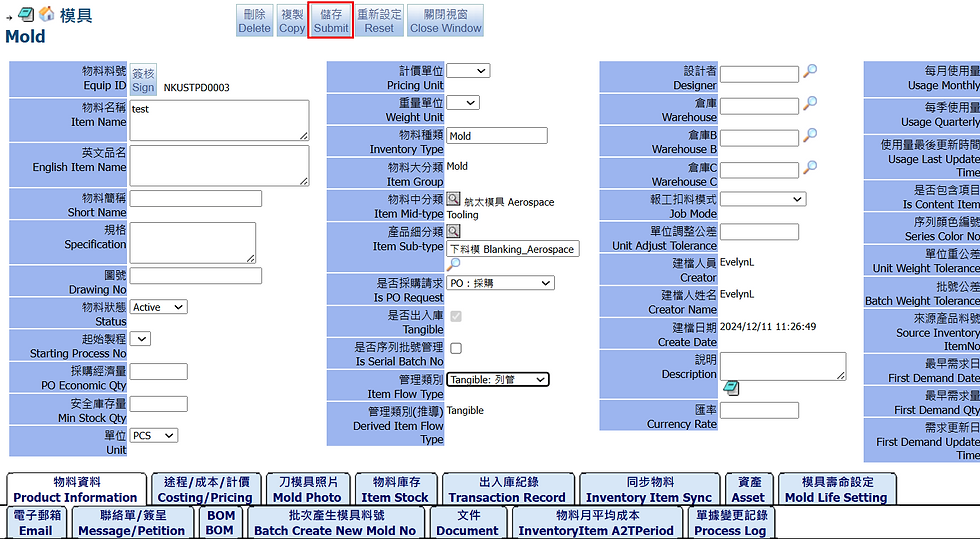
You can modify the information in this editing screen and click "Submit" when finished.
3.6.2. Mold Life
This screen you can query mold life and setting mold Estimated Life and WP Material
In the mold editing screen, you can also setting mold estimated life and WP Material in the tab "Mold Life Settings"

Click Submit when finish

Add WPMaterial
You can go to the tab “Related Item Setting” to add "WPMaterial" , click Setting Name “WPMaterial” and enter the setting screen

Click on the second tab "Add New WP Material", fill in the WPMaterial and click “Add”
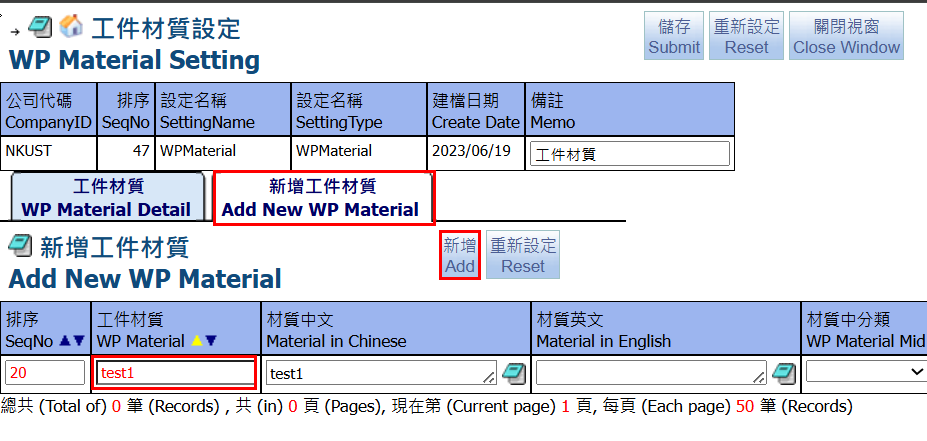
Click tab “WP Material Detail”, you can view all WP Material and edit the Chinese and English names and WP Material Mid Type, or delete the WP Material, click Submit when finish

Add WPMaterialMidType
The Add WPMaterialMidType is the same as the new one in the “Related Item Setting”, please refer to the setting"Add WPMaterial”

3.6.3. Tool Life
This screen you can query tool life and edit tool estimated life and WP Material
In the mold editing screen, you can also set estimated life and WP Material
in the tab "Mold Life Settings", for example :InventoryItemNo=2021-01-02.04

You can fill in the settings and submit or click "ReLoad Tool Life settings " to automatically load the settings, click submit when finish

3.6.4. Add New Mold Serial Item
In this screen, you can add the serial item of the mold. The code is unique and cannot be repeated.
Select the mold to be added, for example, Item No:DRD_10-59-5301-105,
after clicking magnifier to select the WP Material, the Mold Life Qty will be automatically brought in.

Notice: Because the Mold Life Qty has been set in tab "Mold Life Settings", the value will be automatically importedThen click “New Serial Item”,Sure to create serial item

Then click “New Serial Item”,Sure to create serial item

After the addition, the screen automatically switches to the tab "Mold Life", and you can see the newly added Serial Item No.
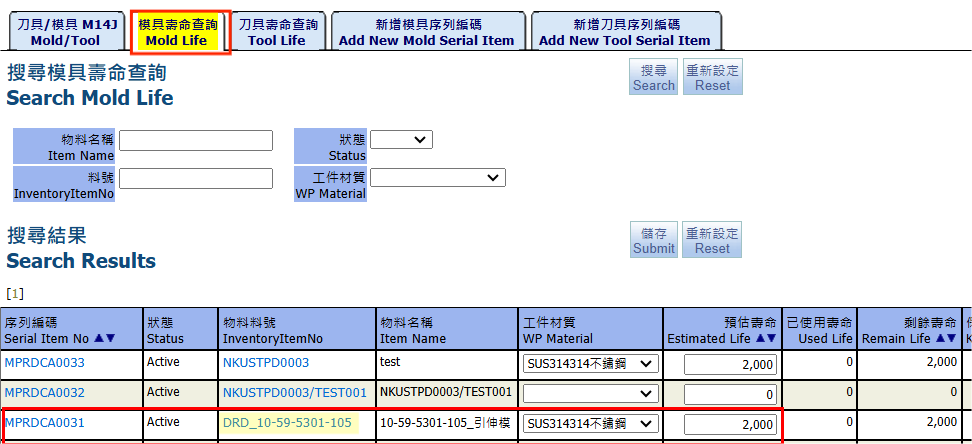
In mold editing screen, you can see the related Serial Item No to the InventoryItemNo:DRD_10-59-5301-105, click InventoryItemNo:DRD_10-59-5301-105 to check


The tool position can be set in the Mold Serial Item editing screen, for example SerialItemNo:MPRDCA0017, click MPRDCA0017 to enter the editing screen

Select the tab "Tool Life Transaction"

Click magnifier, pick Tool Serial Item No, automatically bring in Tool Serial Item No and Tool Item No

Fill in Position ID and click submit when finish

Note:The Tool Serial Item No that has been set cannot be set to other mold Serial ItemNo.
3.6.5. Add New Tool Serial Item
In this screen, you can add the serial item of the tool. The code is unique and cannot be repeated.
Select the tool to be added, for example Item No:2021-01-02.01,after clicking magnifier to select the WP Material, the Tool/Mold Life Qty will be automatically brought in.

Notice: Because the Tool/Mold Life Qty has been set in tab "Tool Life Settings", the value will be automatically imported.

Then click “New Serial Item”,Sure to create serial item

After the addition, the screen automatically switches to the tab "Tool Life", and you can see the newly added Serial Item No.
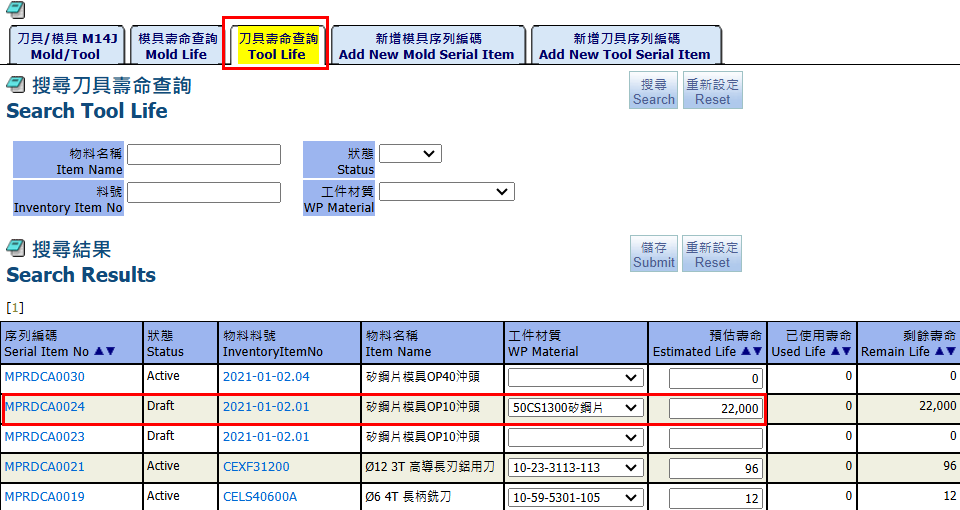
In tool editing screen, you can see the related Serial Item No to the InventoryItemNo:2021-01-02.01, click InventoryItemNo:2021-01-02.01 to check


3.6.6. Set Tool/Mold Serial Item No
The Tool/Mold serial Item No can be set in the relevant tab, such as the following tabs:
Machine Cell and Machine Equipment,Set Tool/Mold Serial Item No
After adding the Tool/Mold Life Qty and Tool/Mold Serial Item No, you can set Tool/Mold Serial Item No in Machine Cell and Machine Equipment

For example:Machine Equipment, click Item No :JD-H400T

Click tab “Basic Information" , you can see Tool/Mold Position


Click magnifier and select tool or mold serial item

After selection, automatically bring in Inventory Type and Tool/Mold Item No, fill in Position ID, click ‘Submit” when finish.

MO Process Detail set Tool/Mold Position
You can set Tool/Mold Position in MO Process Detail, click Manufacturing Orde and tab “MO Process/Formula”
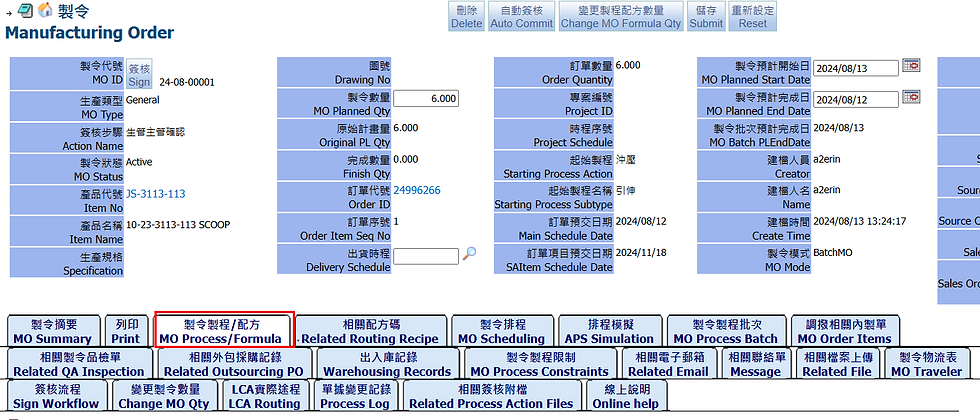
Click on the details to enter the MO Process editing screen.

Machine ID:JD-H400T

According to the previous description, Machine ID: JD-H400T has set the Tool/Mold Position, therefore, In tab “Available Machine”, displays "Machine Related Tool/Mold Position" and "Machine Mold Serial Item Related Tool Position"


So on the tab "Tool/ Mold Position ", click button"Reload MO Process Position" it will automatically load the data.

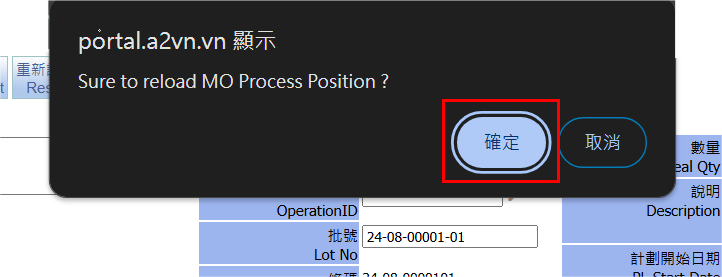
Tool/Mold position settings automatically loaded

MO Process Batch set Tool/Mold Position
In the MO Process Batch, “Tool/Mold Serial Item No(Position)” can be automatically imported from MO Process Detail, click "Details" in tab "MO Process Batch" .

In tab “Tool/Mold Usage”, the tool/mold position setting has been brought in

Item Process set Tool/Mold Position
You can set Tool/Mold Position in MO Process Detail, click Manufacturing Orde and Item No : JS-3113-113

In the Item editing screen, click tab "Costing/Pricing"

In interface “Process Action”, click "Details" to enter the editing screen

Machine ID:JD-H400T
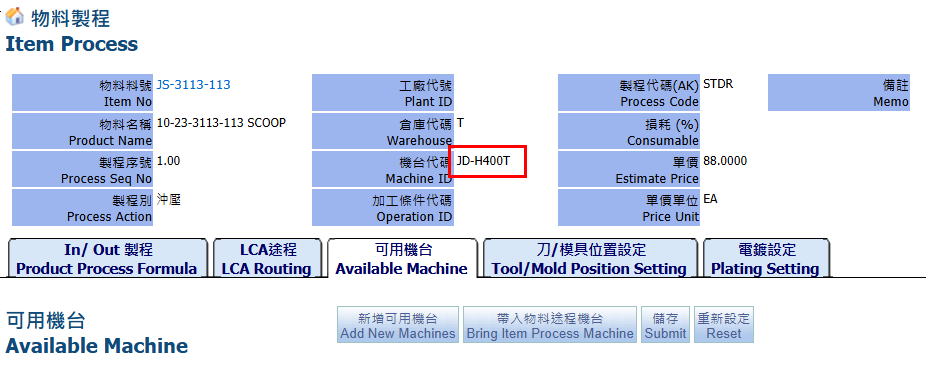
According to the previous description, Machine ID: JD-H400T has set the Tool/Mold Position, In tab “Available Machine”, displays "Machine Related Tool/Mold Position" and "Machine Mold Serial Item Related Tool Position"
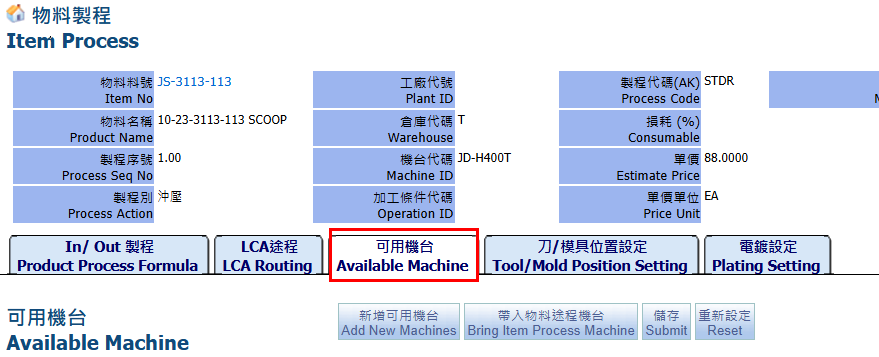

So on the tab "Tool/ Mold Position Setting ", click button"Reload InvItem Process Position" it will automatically load the data.
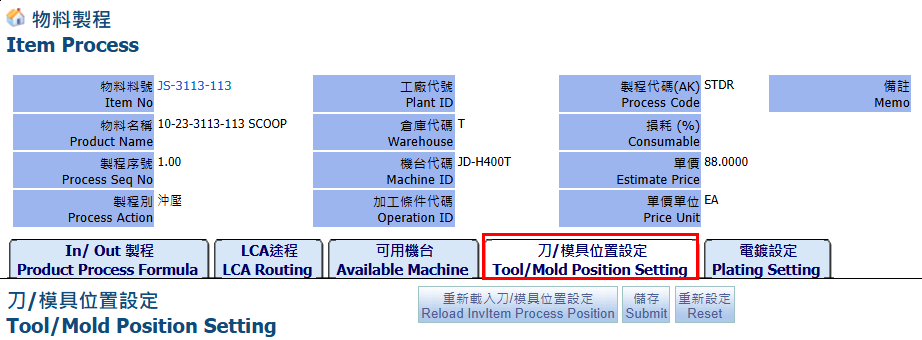
You can pick the tool/mold position that needs to be added, then click "Add to Tool/Mold Position Setting"


Or clicking "Reload InvItem Process Position" it will automatically load the all data.

Machine Related Tool/Mold Position automatically loaded

Add New Machines
If a new machine is added, the machine settings can be automatically brought into the machine related tool/mold position

Click”Add New Machines” and pick the machineID you want to add, then click “submit item”, after completion, close the screen

Available machine ASSEMBLY has been added

You can view the relevant machine-related tool/mold positions

And view the Machine Mold Serial Item Related Tool Position

Click “Reload to InvItem Process Position” , The related tool/mold position of the machineID ASSEMBLY can be loaded into the setting

Or you can go to tab “Tool/Mold Position Setting”, manually add to tool/mold position setting that need to be added

Pick it and click "Add to tool/Mold Position Setting"

Position ID: A has been added to the tool/mold position setting

Tool Life Transaction
When an MO Adjustment is generated, all the Tool/Mold Life Transaction set in the MO Process Batch can be automatically generated (MO Adjustment must be closed).

Click”Auto Create Tool Life” to create the transaction

A Serial Item No generates a Tool/Mold Life Transaction, calculate the life quantity: the MO Adjustment quantity 1 means the unit consumption life of 1.
The Tool/Mold Life Transaction bring in Output Item No and its WP Materia, and
Tool/Mold Life Transaction can’t be generated repeatedly.
click TL TransactionID TL202412001 to check

Output Item No's WP Materia setting:click tab “Product Information” and set WP Materia


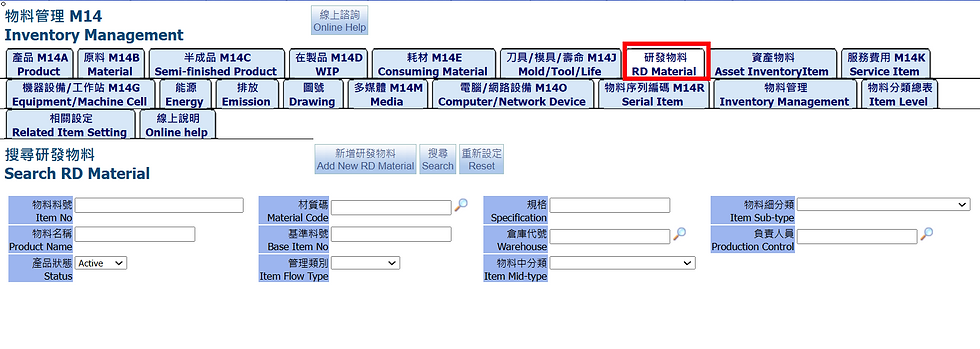
3.7. RD Material
This tab is for searching and adding new R&D materials
3.8. Asset InventoryItem
This tab is for searching and adding asset items.
3.9. Service Item
This screen is for searching and adding new service items. The service items are intangible items, so it cannot be used for warehouse entr, stocking operations and inventory management.
3.10. Equipment/Machine Cell
3.10.1. Machine Equipment
This screen is for adding and querying machines and equipment. For detailed machine or capacity introduction, please refer to the manufacturing order chapter.
3.10.2. Machine Cell
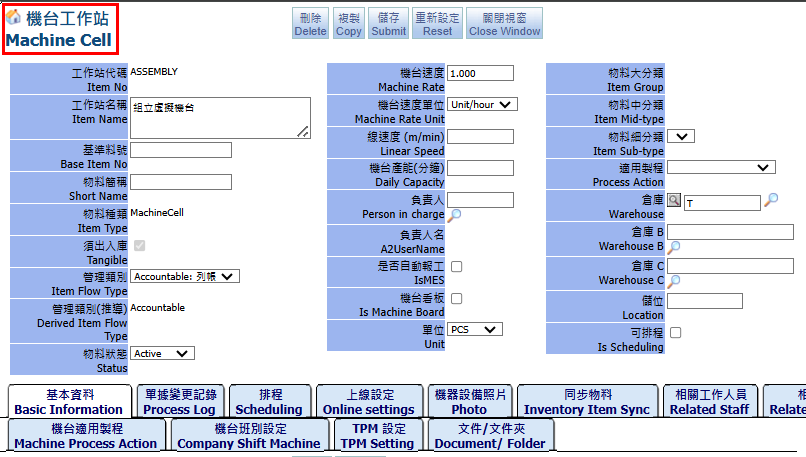
This screen is for adding and querying machine cells. For detailed machine or capacity introduction, please refer to the manufacturing order chapter.
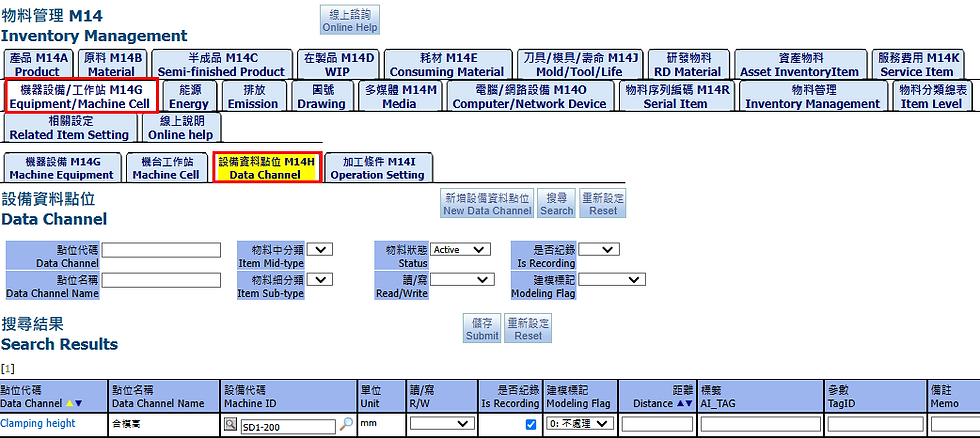
3.10.3. Data Channel
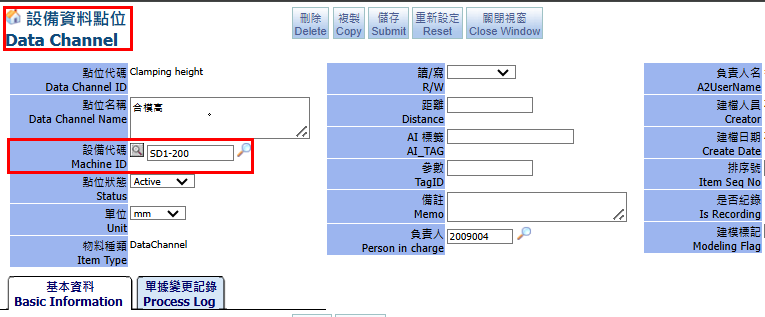
This screen is for adding and querying data channels. The data channels are not real materials, so they are only used to record equipment points. Equipment points can be recorded in machines and equipment.
3.10.4. Operation Setting
This screen is for adding and searching Operation settings. The Operation settings are not materials, so they are only used to record the operation settings of the material process. You can select the operation settings in the material process.
Data channels and setting values can be recorded in the operation settings.
Operation IDs can be selected from Process Action in product screen
3.11. Energy
This screen is for adding and querying energy-related carbon emission factor to calculate carbon emissions, such as natural gas

3.12. Emission
This screen is for adding and querying emissions-related carbon emission factor to calculate carbon emissions, such as wastewater

3.13. Drawing
This tab is to add and search drawings. Drawings are not real material, so it is only used to record the material path. The drawing number can be selected in product screen and used to create a quality inspection template and bring in relevant default custom field values. Such as quality inspection drawing number settings. For detailed instructions, please refer to Quality Management.
Drawing types are divided into process drawings and product drawings
3.14. Media
This tab is to add and search multimedia materials. Multimedia is not a real material. It is used in the material route recipe and brought to the machine dashboard to display the media files of the material.
3.15. Computer/Network Device
3.15.1. Computer/ Network Device
In this screen, you can query the management of computer/network serialization.
3.15.2. Computer/Network Serial Item
3.15.3. Computer Tree View
3.16. Serial Item
Serial Item
This screen can query the material serial code , just like the identity card code of the material, each code is unique.
Add New Serial Item
In this screen, you can add Serial Item. It is necessary to set the item in advance to whether Is SerialBatchNo before it can be added
Click “Add New Serial Item”
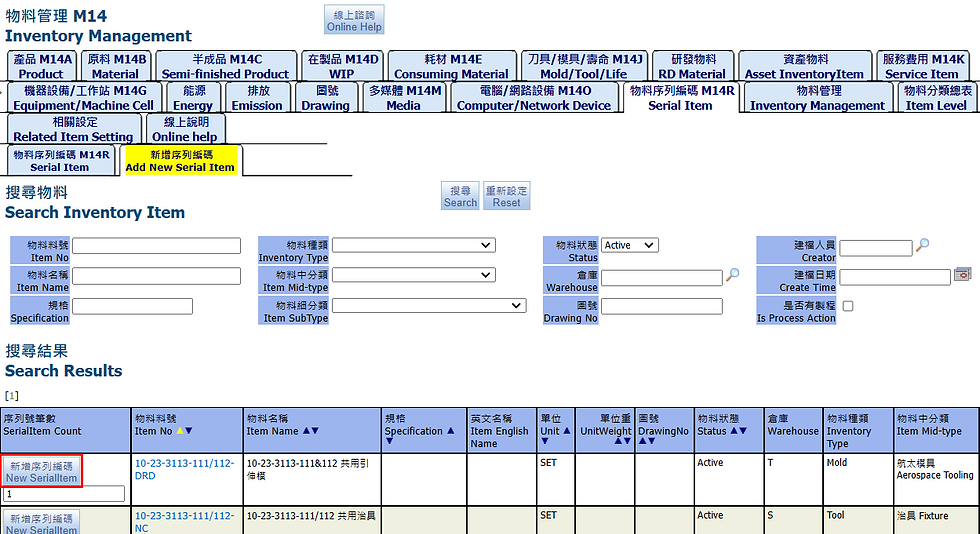
After adding, the screen will go to the tab "Serial Item", click “Search” to check

3.17. Inventory Management
3.17.1. Search Inventory Item
This tab is to search all items.
3.17.2. Draft Inventory Item
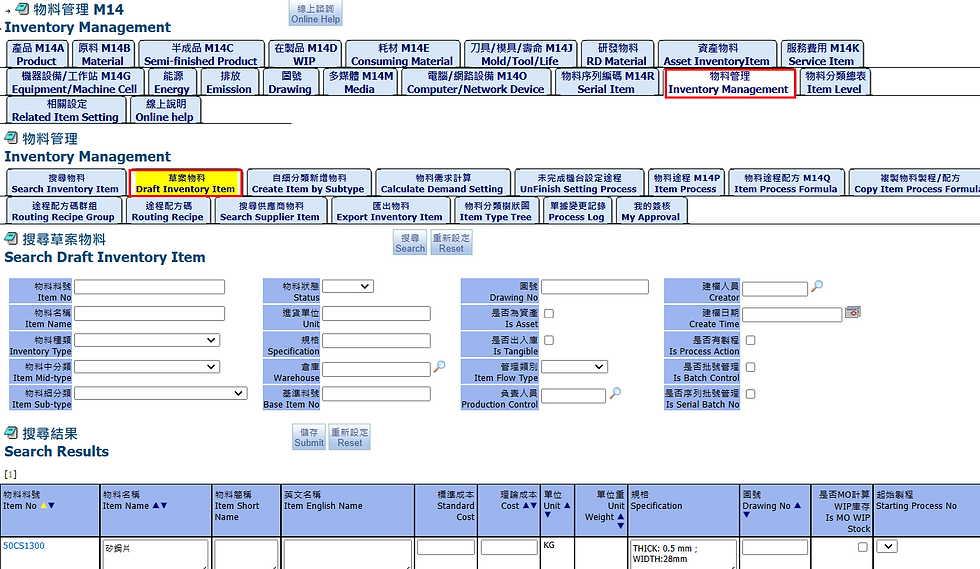
This tab is to search all items with status is draft
3.17.3. Create Item by Subtype
3.17.4. Calculate Demand Setting
This screen calculates the material requirements for the batch and stores the requirements in the basic data
After checking "Is Update Demand" in the search conditions, the system updates the related materials according to the search conditions.

3.17.5. UnFinish Setting Process
3.17.6. Item Process
This tab is to search all manufacture process actions set in items
3.17.7. Item Process Formula
You can check the processes and recipes of all materials on this screen
3.17.8. Copy Item Process Formula
This screen can query all materials and copy other materials to generate MO processes and formulas. Only materials that hasn't create MO process and set "Is PO Request" are displayed

3.17.9. Item Assembly
This screen is for adding and querying material combinations
Input materials can be defined in the material combination. When this material combination is selected in the item process formula, the manufacturing process formula will be brought in, and the actual input materials can be selected in the manufacturing process formula. For detailed instructions, please refer to the manufacturing process formula.
3.17.10. Routing Recipe Group
This tab is to add and search Routing Recipe Group
Recipe IDs can be added to the recipe code group
Here you can see what materials are available to specify this formula code
3.17.11. Routing Recipe
This tab is to add and search Routing Recipe ID.
In the Routing Recipe ID, you can define related processes and process fomulas
You can refer to Item Edit description of Routing Recipe
3.17.12. Search Supplier Item
At this tab, you can search items that link with suppier ID.
This data needs to be maintained in the basic material data. You can refer to tab Costing/Pricing in inventory item editing screen.
3.17.13. Export Inventory Item
This tab is to export inventory item data to excel file
3.17.14. Item Type Tree
In this screen, you can view the item type displayed in a tree diagram.
3.17.15. Process Log
This screen can search all material's data change records
3.17.16. My Approval
This screen you can allows batch approval of all transaction
3.18. Item Level
Item level are divided into Item Group, Items Mid-Type and Item Sub-Type
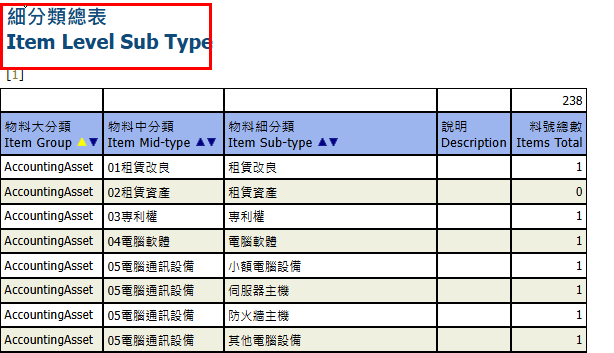
3.18.1. Item Level
You can query the item of Item Group, Items Mid-Type and Item Sub-Type
3.18.2. Items Mid-Type
You can search Items Mid-Type and add Mid-Type, for example, add the mid-type of the Materials
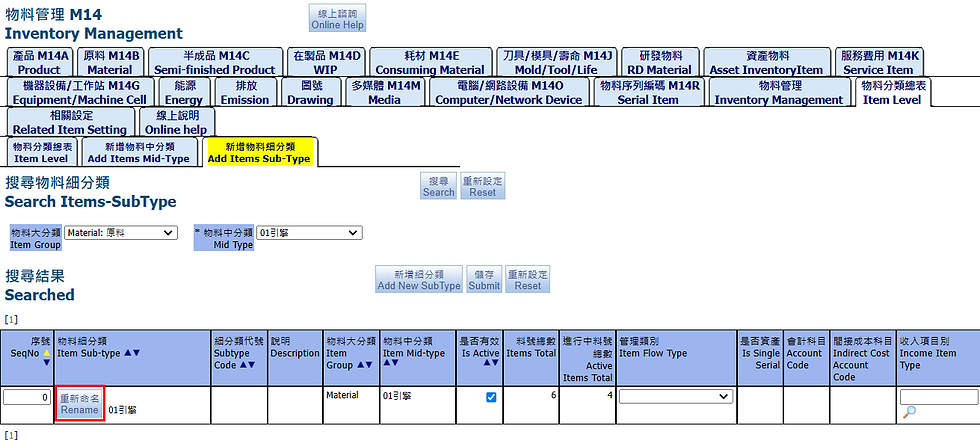
3.18.3. Items Sub-Type
You can search Items Sub-Type and add Sub-Type, for example, add the sid-type of the 01引擎
Click “Add New Sub Type”, enter Sub Type name

You can rename
3.19. Related Item Setting
3.19.1. Related Setting
Here you can view settings relate to product, such as material units,...
3.19.2. Process Action Setting
3.19.3. LCA default

3.19.4. Search Process Subtype
3.19.5. Batch Update PC
You can update production controller
3.19.6. Form Setting
You can set the content of the form yourself, such as purchasing inspection
Fill in the inspection code and caption, and subsequent purchased inspections can be carried out based on this setting

3.20. Online help
On this screen, you can view online documents or help content. If you need to upload files, you need to enter the setting page of the approval process.
End.


