Payable Management
- Jun 8, 2024
- 17 min read
Updated: Aug 16, 2024
Management of PO or non-PO related account payables, multi-currency handling, fast creation of the corresponding vouchers, real-time AP summary and detailed reports
Home page => Operation => Account Payable => UI Account Payable Management
Click Payable Management from the operation menu to go to the Payable Management screen.
1. Create APs
This screen can automatically transfer from upstream documents to payable documents according to different purposes. There are several ways:
1.1. PO Receiving to APs
At AP Management screen, you will see “Create APs” tab, go to “PO Receiving to AP” tab. Click “Search”, all the PIs will show.
PO receiving transfer AP means the payable due to the purchase of items. You can search by the schedule date or supplier. The search result is the purchase receiving records
In the search for purchase receiving orders, select the receiving order that needs to be generated this time and click “Add New” to create the account payable.
The system will default to combine based on suppliers and schedule date. If you need to exclude date merging conditions and only combine based on suppliers, you need to click "Open Method" to combine.
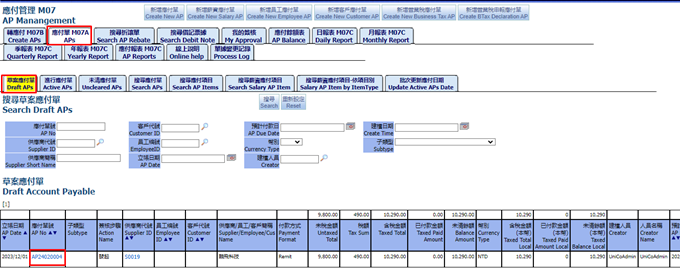
Next Step, after generation, the system screen will go to the draft APs. Click the Account payable number to enter the Account payable editing.
After entering the Account payable, you can see that the system automatically brings in the payable items and links them to the purchase warehousing and purchase order items. The payable items will be brought into the item type "GoodsPayable" according to the nature of the purchase, and the items can be set Cost accounting accounts to generate correct voucher accounts
Pull to the right to see the original purchase receiving and purchase order items
After checked and saved basic information of AP as Account Payable Data, Account Payable Item, we will sign AP or you can use automatic sign-off.
Because the operation of manual sign-off is more complicated, the sign-off method for all documents is the same. The steps are introduced here:
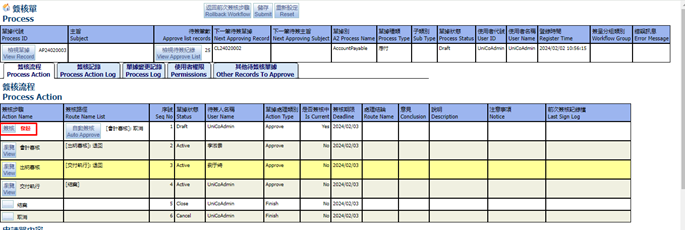
Manual Sign Workflow
The manual sign-off method is as follows, click "Sign" to enter the sign-off form screen
Click to sign in the current sign-off status (red text), and you must confirm that the signer is the person or the user's agent.
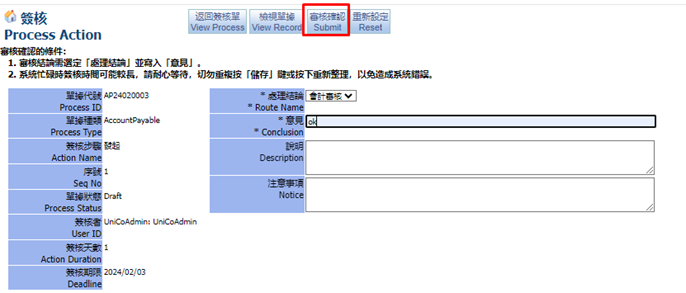
In the Process screen, with each approving steps click on Sign or View. When clicking on sign button will have the screen.
In the sign-off step, select the Route Name and fill in your Conclusion
After confirmation, press Submit to confirm
The system will notify you if you have not filled in the notes and ask if you still want to sign. You can click OK.
After successful approval, press OK
If you can see that the Route Name cannot be amended and the document approval steps have been updated, it means the approval is successful.
If you choose automatic sign-off, the steps will be automatically performed. Select the first priority conclusion in the Route Name and automatically fill in the opinion "ok". You can query the entire sign-off process record in the sign-off form.
Or you can directly click View Record to return to the edit screen. The record can be viewed both during the approval step and the approval form.
1.2. PO Item Receiving to APs
PO Item Receiving transfer to AP means the payable due to the purchase of items. Different from "PO Receiving transfer to AP", this page can only generate this payable for some PO items with various temporary situations.
After checking the items, new account payable will be generated
After generation, the screen will switch to the draft account payable. The subsequent operations are the same as "PO Receiving to AP" in the previous chapter. Please refer to the previous description.
1.3. Intangible PO Item to APs
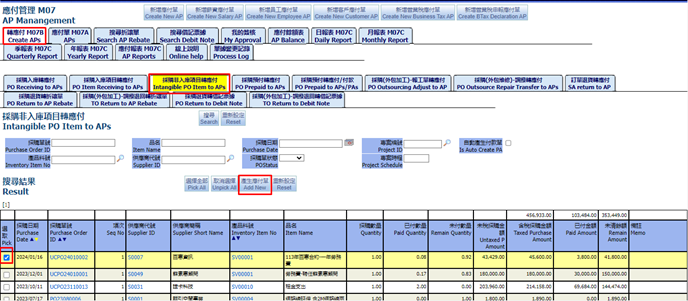
Go to AP Management, you will see yellow Table “Intangible PO Item to APs" and click “ Search “. All the Service PO will be shown.
Intangible PO Items are transferred to payables, which means that the purchased materials are not subject to warehouse-in/out management, such as service item, universal item and other processing or expensed items. Since they do not belong to the inventory, they are classified as non-warehousing items. After selecting the purchase item in the search results, new account payable will be generated
In the next step, after generation, the system screen will go to the Draft AP. Click the Account payable number to enter the Account payable editing.
After checked and saved all basic information of AP as Account Payable Data, Account Payable Item, you will sign AP.
After entering the Account payable, you can see that the system automatically brings in the payable items and links them to the purchase order items. The payable items will be brought into the item type as "ServicePayable" according to the nature of the non-warehousing purchase, and the expense name can be selected in the payable items. In order to generate the correct voucher account, the default value of the expense name will be brought in from the item basic settings.
Pull right to see the purchase order item link
The subsequent operations are the same as the previous chapter "PO Receiving transfer to APs", please refer to the previous description.
1.4. PO Prepaid to APs
Go to AP Management, click on “PO Outsource Adjust to AP” tab and click “Search”. All the Adjustment that have related PO Outsource will be shown.
PO Outsourcing Adjust is transferred to AP based on the nature of the purchase order for processing services. For example, if outsourcing processing is ordered, the purchased item number is the service item number, and the processed items are completed products, so they need to be generated after the completion and storage (adjustment order) accounts payable
We choose Adjustment item in the search results and then press “Transfer Selected Item(s)” button, new Account Payable will be generated. You can also directly enter this screen and enter the warehouse code (supplier) to select multiple payable items to generate a combine AP.
After created, the screen will go to the Draft Account Payable. Click on the Account Payable to confirm the information.
After entering the Account Payable, you can see that the system automatically brings in the payable items and links them to the adjustment order items. The payable items will be brought in according to the non-warehousing nature of the purchase as "ServicePayable" and the corresponding expense name. This default the value is brought in from the item basic settings
Pull to the right to see the link to Adjustment number and purchase order number. The subsequent operations are the same as the previous chapter "PO Receiving transfer to AP". You can refer to the previous description.
1.7. PO Outsource Repair Transfer to APs
Go to AP Management, click on “PO Outsource Repair Transfer to AP” tab and click “Search”. All the Transfer will be shown.
Purchasing transfer to payable is based on the purchase order for service nature. For example, if the mold is sent for repair, the items sent for repair come in and out of the same mold. Therefore, accounts payable need to be generated when the transfer is transferred back to the warehouse.
If the search result cannot be found, please confirm whether the subtype "Outsource" has been filled in in the purchase order, and the source order has been filled in in the transfer order.
Account Payable will be generated after checking the transfer item in the search results
After generation, the screen will go to the draft Account Payable. Click the AP number to enter the Account Payable editing.
After entering the Account Payable, you can see that the system automatically brings in the AP items and links them to the transfer order items. The payable items will be brought in according to the nature of the non-warehousing purchase, with the item type being "ServicePayable" and the corresponding expense name. This default value is brought in from the item basic settings
Pull to the right to see the link transfer order number and purchase order number
The subsequent operations are the same as the previous chapter "PO Receiving transfer to APs", please refer to the previous description.
1.8. SA return to AP
Go to AP Management, click on “SA return to AP” tab and click “Search”. All the SA return will be shown.
The purpose of converting SA return to AP means that the purpose is to pay the customer due to the return behavior of the order. This situation is also listed as a kind of Accounts payable. After selecting the SA return in the search results, new Account Payable will be generated.
After created, the screen will switch to the draft Account Payable. Click the Account Payable number to enter the Account Payable editing. The subsequent operations are the same as the "PO Receiving to APs" in the previous chapter. Please refer to the previous description.
Go to AP Management, click on “PO Return to AP rebate” tab and click “Search”. All the PO Return will be shown.
PO return transfer to AP, allows you to quickly create a discount Account payable based on the purchase return record.
After selecting the PO return order in the search results, select the Account payable that needs to be discounted this time and generate Account payable rebate. The Account payable can be searched for the Account payable generated by the original purchase order using the magnifying glass. If the Account payable has been paid or reversed, you cannot select it, and you need to select another Account payable from the same supplier.
After created, go to “Search AP Rebate” >> “Search Draft AP Rebate” to find AP rebate that you just created and sign
1.10. TO Return to AP Rebate
Go to AP Management, click on “TO Return to AP Rebate” tab and click “Search”. All the TO Return will be shown.
TO Return to AP Rebate is an action that needs to be returned due to discrepancies found after the order is put into the warehouse. A transfer return order must be generated first. The operation of generating Account Payable is the same as the "PO Return to AP Rebate". Please refer to the previous description
1.11. PO Return to Debit Note
Go to AP Management, click on “PO Return to Debit Note” tab and click “Search”. All the PO Return will be shown.
PO returns to Debit notes can quickly generate supplier debit notes based on the purchase returns record. The reason may be that there are no discountable payable notes, so a debit note is generated to record the supplier's commitment as future payables.
We choose PO Return and then press “Add new Debit Note” button.
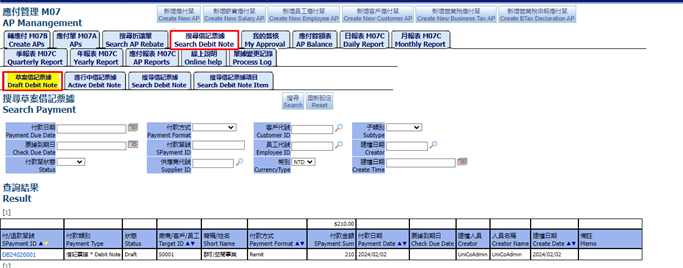
After created, the screen will automatically switch to Search Debit Note. You can search for the debit notes just generated in Search Draft Debit Note
Click the Debit Note number to enter the Debit Note editing
1.12. TO Return to Debit Note
Go to AP Management, click on “TO Return to Debit Note” tab and click “Search”. All the TO Return will be shown.
TO Return to Debit Note is an action that requires a return due to discrepancies found after the order is put into the warehouse. TO Return must be generated first. The operation is similar to "PO Return to Debit Notes". Please refer to the previous description.
We choose TO Return and then press “Add new Debit Note” button. After created, go to “Search Debit Note” >> “Search Draft Debit Note” to find Debit Note that you just created and sign
1.13. Create manual AP
Go to AP Management, click on “Create new AP” button to manually add Supplier Account Payable, rather than automatically transferring it from a certain document
The screen will open a manually added screen. You need to use the magnifying glass to select the supplier. The default fields such as currency, tax rate and other information will automatically be brought in.
Note: Fields have prefix = “ ” is required
After confirmation, click Add New Payable
After completion, a new supplier Account payable will be generated.
1.14. Create Salary AP
Go to AP Management, click on “New Salary AP” button to create Salary AP
You can create item manually
After the addition is completed, you need to click "Recreate AP Items" to allow the system to automatically generate account payable items. Since the salary plan summary table is only a preliminary operation, the subsequent system will generate Voucher and payments based on the actual payable items.
Salary-related payment orders can be automatically generated in the Supplier payment tab, such as salary payments or labor health insurance payments, etc.
1.15. Create New Employee AP
After click Create AP Employee you will see the full screen following
After filling in the relevant fields, click Add New to add new Employee Account Payable
You can use the magnifying glass to search for the employee code, enter the tax rate, Payment Format, Invoice Date and other information and click Add New to add new Employee Account Payable
The method of adding new items is the same as adding new items of Account payable. It will be introduced in detail in "Editing APs". Please refer to the explanation in the following chapter.
1.16. Create Customer AP
Go to AP Management, click on “New Customer AP” button
“New Customer Account Payable” screen will be shown. Fill in necessary information then click “Add new” button.
Note: Fields have prefix = “ * ” is required
The screen will open a manually added screen. You need to use the magnifying glass to select the customer, and the default fields such as currency, tax rate and other information will be automatically brought in.
After confirmation, click Add New to add new Customer AP
After completion, new customer AP note will be generated.
The method of adding new items is the same as adding new items of Account payable. It will be introduced in detail in "Editing APs". Please refer to the explanation in the following chapter.
1.17. Create Business Tax AP
The Business Tax Account payable is a special payable document, so it needs to be generated manually. Click to add new Business Tax AP.
In the newly added screen, you do not need to select the payable object. The system will automatically bring in the payable object as the TaxBureau. You need to specify the TaxBureau code in the company settings in advance.
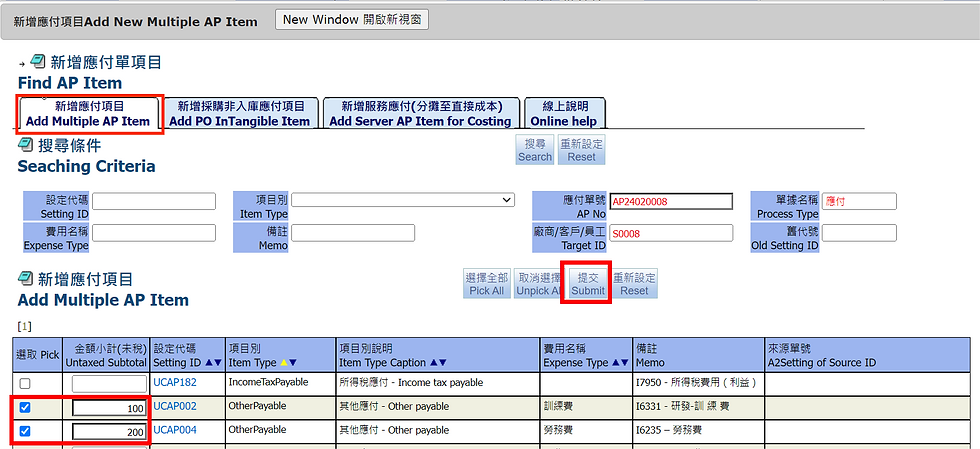
After generating the Account payable, click Add New Multiple AP Item
Submit after selecting BusinessTaxPayable in the subtype settings
Just go back to the AP items and fill in the correct tax base amount and unit price.
1.18. Create BTax Declaration AP
The purpose of this button to create new Account Payable for Business Tax Declaration. Therefore, the Account Payable is a special payable document. The current normal operation mode is to automatically generate the declaration data from the invoice module. It can also be generated manually here.
UI Account Payable Management => Click button Create BTax Declaration AP:
After click Create BTax Declaration AP you will see the full screen following, select the Tax period (the period must be completed first) and click Save.
After generation, the screen will open to edit the Business Tax Declaration AP
Items can be added by adding items. If it is automatically generated from the invoice module, there is no need to add items.
Automatically generated will be automatically brought into the AP Item based on the declaration results.
2. Edit APs
After create AP successfully, we will click on AP ID to open AP screen
Although there are Account Payable for different transaction objects in the system, such as Supplier payable, Customer payable, and Employee payable, the screens are very similar. Only the special payable documents such as Salary payable, Business Tax payable, and Business Tax Declaration payable have slightly different screens. In the general, the functions are still similar, so we will take Supplier Payable as an example to explain in detail.
First open Account Payable
On the top of this screen, you see some buttons as Delete, Auto Approve, Update Currency Difference, Submit, Reset.
There is a delete button at the top for deleting documents, a Submit button for saving information at Header after changing or adjusting, and an Update Currency Difference button that is used to calculate exchange gains and losses during reversal. Manual selection is usually not required. There is also an automatic approval button that can be used with one click to sign off to next step
Delete: use to delete current AP
Auto Approve: Auto sign to next step, based on Route Name.
For example: Route name of this AP = 財務確認, status = Draft.
If you use automatic approval, the document can be automatically approved to the next approval step.
After click auto approve, this AP has status = Active
The next sign-off step is also displayed on the upper right, so you can confirm it before signing automatically.
2.1. Account Payable Data
In the Account Payable Data, you can view the items payable this time, including quantity, unit price, subtotal, etc. If the Account Payable is a previous order, the item content will be automatically brought in. If you need to add additional items, you need to click Add New Multiple AP Item
There are several ways to add payable items. The first one is based on the content set in the voucher setting, such as the expense type, and you can also select the source ID, select and enter the amount and submit it.
The second method is to select intangible PO items. Because sometimes it is necessary to merge the warehousing and non-warehousing items into the same Account payable, usually the warehousing Account payable will be generated first and then the non-warehousing items will be added.
After the addition is successful, return to the Account payable to view the items.
If you need to add Server AP Item for Costing, please go to this tab

2.2. Print
In this tab you can select any report ID to print.
2.3. Invoice Information
This tab is use to adjust Invoice Information, create new invoice and show related invoice
You can view and add supplier invoices in the invoice information. You can semi-automatically generate payable invoices or use quick generation invoices. After generating, click on the invoice for editing.
2.4. Supplier Payment
This tab shows buttons to create Supplier payment, related Supplier payment and Supplier payment Items
2.5. AR Item Write Off
In this tab you can see related write off records of prepay.
In this screen, you can perform reversal operations on Account payable, advance payments, and temporary payments.
2.6. Voucher Process
This screen shows related voucher and we can semi-automatically generate voucher at here
Create new voucher: when click on this button, show the Voucher management screen that use to create voucher for AP
2.7. Cost Adjustment
This tab is to show related Cost Adjustment and create adjustment for AP item linked with PI.
Cost adjustment orders corresponding to invoice discounts can be generated here. Cost adjustment orders can only be generated for inventory type and if the material has unused incoming inventory, the cost of the month on the date of the payable order will be adjusted, so the current month must be in billing status.
2.8. Related Email
This screen shows related Email
New Email: this button is used to create related Mail for AP
2.9. Message/Petition
This screen shows related Message and Petition, you can create related Message and Petition, and link and track these documents.
Create new Message: this button is used to create related Message for AP
Create new Petition: this button is used to create related Petition for AP
2.10. Related file
In this tab you can upload the file if need, usually images or text files.
2.11. Currency Convertion
This tab used to change currency. Choose Currency and Click Submit to change. After changing the currency, the exchange rate will be automatically converted.
2.12. Update Closed AP
In this tab you can change memo related fields when AP closed.
The content can be modified on this screen. The content cannot be changed when the document status is closed. However, some fields can be changed here without affecting important data.
2.13. Process Log
This screen shows related Process Log. Only have process log when AP status = Active
In this screen, you can view the change record of this document, which will record the change person, change time and change field.
2.14. Sign Workflow
In this screen, you can view the approval process currently defined for this document.
2.15. Related Process Action Files
In this screen, you can view the attachment record of the approval form. If you need to attach files, you need to enter the approval form.
2.16. Online help
On this screen, you can view online documentation or help content. If you need to upload files, you need to enter the setup page of the approval process.
3. APs
This page is for querying Account payable, which can be queried based on different statuses and search conditions.
3.1. Draft APs
This screen shows all Draft APs
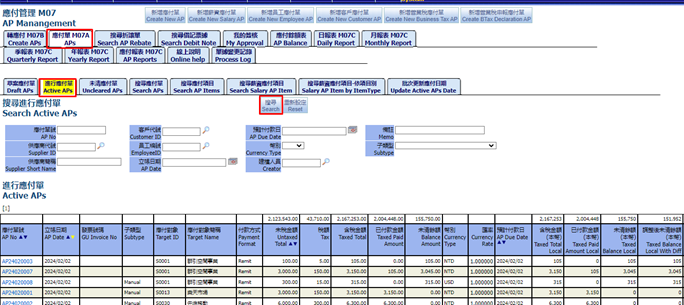
3.2. Active APs
This screen shows all Active APs
3.3. Uncleared APs
Uncleared APs: show all APs with unpaid amount or reversed and AP status = active/ close.
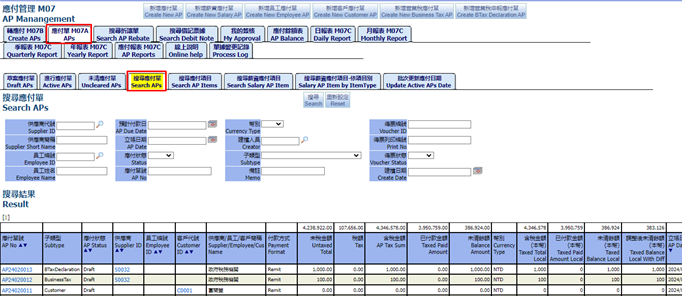
3.4. Search APs
Search APs: show all APs for all statuses.
3.5. Search AP Items
Search AP Items: show all AP Items for all statuses.
3.6. Search Salary AP Items
Search Salary AP Items: show all AP Items and AP type = Salary.

3.7. Salary AP Item by ItemType
You can search Salary AP Items by Ap Item Type

3.8. Update Active APs Date
You can update Ap date>Filling Date>Pick>Update
4. Search AP Rebate
This screen shows all AP Rebate with different purpose
4.1. Draft AP Rebate
Show all draft AP Rebate
4.2. Active AP Rebate
Show all active AP Rebate
4.3. Search AP Rebate
Show all AP Rebate transactions for all statuses.
4.4. Search AP Rebate Item
Show all AP Rebate Items for all statuses.
5. Search Debit Note
This screen shows all Debit Note with different purpose
5.1. Draft Debit Note
Show all draft Debit Note
5.2. Active Debit Note
Show all active Debit Note
5.3. Search Debit Note
Show all Debit Note for all statuses.
5.4. Search Debit Note Item
Show all Debit Note Items for all statuses.
6. My Approval
This screen shows all APs were created by yourself to sign.
7. AP Balance
The AP Balance table is for querying the payable status at each point in time. There are the following query tables according to different purposes.
7.1. AP Balance
This report will search AP balance by AP, we can search based on the statistical deadline.
Click "Export to Excel" to export the results as an Excel file

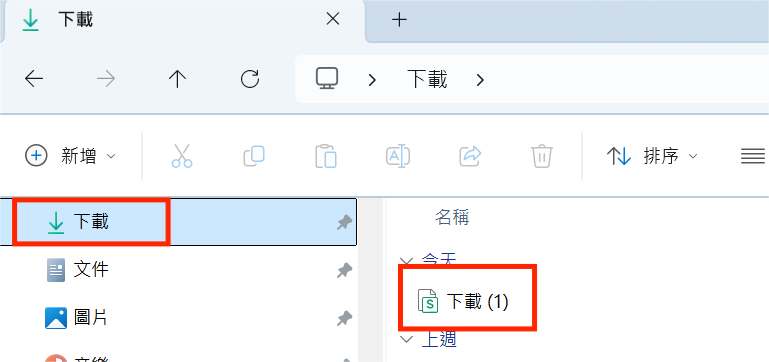
Go to PC, file "Download"to open the Excel file
This report will search AP balance by transaction object (target ID), we can search based on the transaction object and the statistical deadline.
7.3. AP Item Balance
This report will search the balance of payable items based on the statistical deadline.
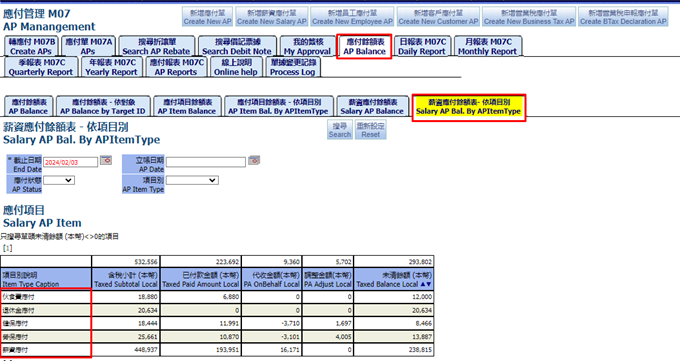
This report will search the statistical balance of payable items by item type based on the statistical deadline
This report will search salary AP with APItemType Balance, we can search by any date of end date.
The salary AP balance sheet only calculates the salary payable balance, because the balance sheet payable in the previous chapter does not include salary.
Click "Export to Excel" to export the results as an Excel file

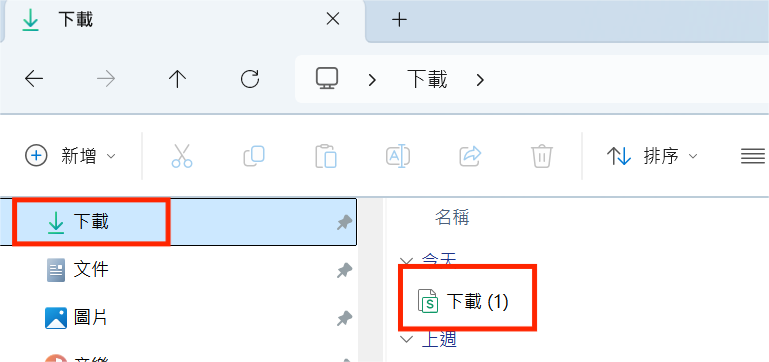
Go to PC, file "Download"to open the Excel file
This report will search the balance of the salary payable according to the item type based on the statistical deadline.
8. AP Report
The payable statistics table is a report that counts the payable orders that have been generated according to different analysis methods, so it has very flexible rules. The following introduces each report:
8.1. Daily Report
Day: show AP information that group by Date
Daily report statistical results are based on the payable date as the search range, and the results are divided into different merging methods
8.1.1. Date
Consolidate by date to display the daily amount payable
8.1.2. Date, Supplier
Day, Supplier: show the daily amount payable that group by Date and Supplier
8.1.3. Supplier
Supplier: show the amount payable that group by Supplier
8.2. Monthly Report
This screen shows AP information by month.
The monthly report statistical results are based on the payable date as the search range. The results display the daily amount payable in that month. The presentation method is fixed for 31 dates. The results are divided into different consolidation methods.
8.2.1. Supplier
Show the AP amount per day of the month that group by Supplier.
8.2.2. Dept. Fee Report
Show the AP amount per day of the month that group by accounting department of the payable item
8.3. Quarterly Report
This screen shows AP information by quarter
The statistical results of quarterly statements are based on the payable date as the search range. The results show the amount payable for each quarter of the year. The presentation method is fixed for 4 quarters.
8.3.1. TargetID
Display the amount payable for each quarter of the year and group by transaction object (Customer ID, Supplier ID or Employee ID can be TargetID)
8.3.2. Dept. Fee Report
Displays the amount payable for each quarter of the year and group by Accounting department of the payable item.
8.4. Yearly Report
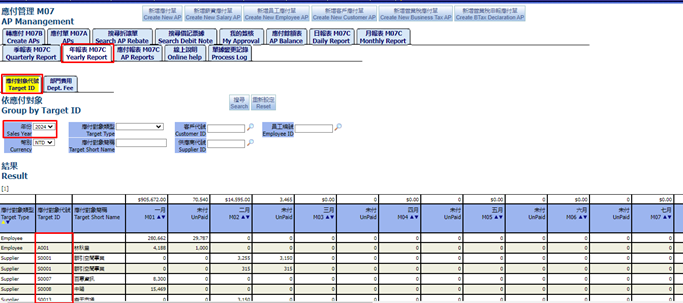
The annual report statistical results are based on the payable date as the search range. The results display the monthly amount payable for the year. The presentation method is fixed for 12 months.
8.4.1. TargetID
Display the monthly amount payable of the year and group by transaction object (Customer ID, Supplier ID or Employee ID can be TargetID)
8.4.2. Dept. Fee Report
Displays the monthly amount payable of the year and group by Accounting department of the payable item
8.5. AP Reports
AP Summary Report for printing multiple payable documents
9. Online Help
On this screen, you can view online documentation or help content. If you need to upload files, you need to enter the setup page of the approval process.
10. Process Log
In this screen, you can view the change records of all payable orders, which will record the change person, change time and change field.
End.


