Procurement Management
- Jun 9, 2024
- 17 min read
Updated: Aug 21, 2024
Purchase Module
• Management of inquiries, and purchase orders
• Link to the corresponding records, such as orders, supplier invoices, receiving records.
In purchase module, we have below function tab:
1. Purchase Order
1.1. Create PO
Go to Purchase Management, tab Purchase Order. Click on the button “Add New PO” to add a new document as figure below
New screen is as follows, fill in the following information
Click on icon to find supplier.
Then, a new screen opens. You can select a supplier ID in “Result” or find with Supplier Name, Supplier ID to quickly find a supplier.
Select a supplier you need by clicking the Pick button. Search screen will turn off.
Besides that you can fill in Purchase Order Title, or use icon to select Project ID and Project Schedule to bring into new purchase order.
Click submit button to create new purchase ordes shown as below.
1.2. Edit PO
Enter the purchase order editing screen to perform editing actions.
At the top is buttons: submit and reset the value created
+ Delete: to delete PO
+ Copy PO: to copy information of this PO to create new another PO.
+ Auto commit: to auto sign PO status to next step.
+ Submit: to save changes at the header.
+ Reset: to reset the value filled.
Below is the basic information about PO: Purchase Order ID, Supplier ID, Action Name, Tax.... -> check all information and correct if necessary change. Especially select warehouse for PO, if the PO for the service items are not required to enter the warehouse.
The next section is Tabs to adjust the purchase order -> will be detailed in the section below:
You can edit the warehouse by clicking on the magnifying glass to select the desired warehouse. Then click submit
1.2.1. Adding new purchase order items
At PO, PO item below, click on Add PO Item button, the following screen appears
Having the correspond Tabs to group of items (products) want to add into current PO.
For example: go to “Product” Tab to search product category. Can search by the code if that item no was known or search by name, then click on “Search” button.
Found items will be added, check the box of the column Pick, input quantity at column “Price Quantity” if you want, pressing "Submit Items". When finished, press close in the upper right corner to close the screen.
Note: You can select one or more items, then close the product search screen. You can also select multiple items by pressing the Pick All button and uncheck all by pressing the UnPick All button
If add items successfully
Then click button close, will see added items in the PO screen
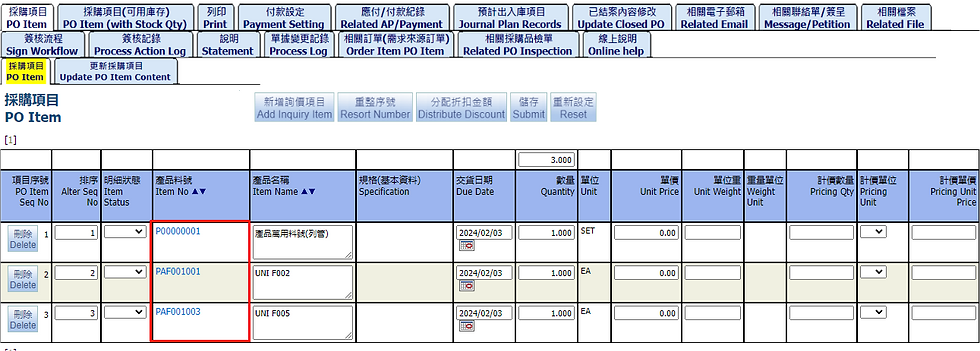
Fill in the "Quantity” if you haven't filled already and “Unit Price” for this code.
Fill unit price for each item and click Submit button to save.
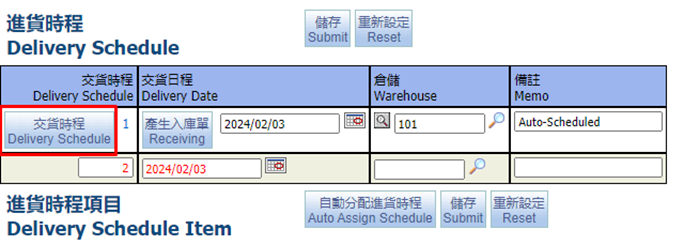
Create Delivery Schedule
In the delivery schedule part can create multiple delivery schedules. Type text into the memo field, select Delivery date and warehouse, then click "Submit” = > result was a delivery schedule has been created. Record no. 2 for second delivery schedule, keep doing the delivery schedule like the first delivery schedule if want to create the second delivery schedule.
If the order is delivered in a day (no need to create multiple calendars) then click on "Auto Assign Schedule" button.
If you need to add Delivery Schedule Item, you click Delivery Schedule number, then it will open screen below.
At Search PO Item, click search to show all items that haven’t created schedule yet, pick choose items and adjust quantities if needed, click Submit Selected items to add.
If want to delete schedule created, you click Delivery Schedule number, click Delete button at the top page.
1.2.2. Update PO Item Content
Click to “Update PO Item Content” tab
Fill in the unit price, discount amount, etc., and click "Update PO Item" button to update the information.
1.2.3. PO Item (with Stock Qty)
In this screen, you can check the inventory status of each purchasing item.
1.2.4. Print PO
You can select the report name to print in this tab
1.2.5. Payment Setting
In PO, you can click on the Tab " Payment Setting " to fill related information for payment and shipping.
1.2.6. Related AP/Payment
You can view related payable orders, payment items, payable items and other information. If payable order has not yet been generated, click the following buttons to automatically create a payable order according to different situations:
1.2.7. Journal Plan Records
This tab displays the items expected for importing stock
1.2.8. Update Closed PO
1.2.9. Related Email
This screen displays related emails. You can also click “New Email” to create a new one.
Click the Mail ID to enter the editing screen and fill in the relevant content.
1.2.10. Message/Petition
On this screen, you can view related messages/ petitions, and can click New Message/ New Petition to add them.
Click “New Message” to create Message
Click “New Petition” to create Petition:
1.2.11. Related File
In this screen, you can upload related files of PO, usually images or text files.
1.2.12. Sign Workflow
In this screen, you can view the approval process currently defined for the document.
1.2.13. Process Action Log
In this screen, you can view signing records of PO approval
1.2.14. Statement
This screen allows you to view the description text of the system reminder.
1.2.15. Process Log
In this screen, you can view the change records of this PO, which will record the change person, change time and change field.
1.2.16. Order Item PO Item
Purchase items related to the sales order can be queried at this tab
1.2.17. Related PO Inspection
You can query the quality inspection form of related purchases. If you want to add a new quality inspection form, select and pick choose items. Click "Create PO Inspection" button
1.2.18. Online Help
On this screen, you can view online documents or help content. If you need to upload files, you need to enter the setting page of the approval process.
1.2.19. Sign PO work flow
The process of document approval from draft to active to close. Click on: Sign (figure above)
Approval screen opens
Note: Depending on the sub type of PO there will be different in signing steps
PO: Draft -> Approving: purchase staff, Approving ->Approved, Approved ->Part filled: warehouse staff, Part filled ->Filled: warehouse staff, Filled - >Close: warehouse staff.
Note: sign PO of service items, just a step: Approved -> close or Active -> Close.
Cancel signing PO: Approving -> Cancel
In the Process screen, with each approving steps click on Sign or View. When clicking on sign button will have the screen.
Select Route Name corresponds and fill in the Conclusion, without either signing will not be succeed. The other steps to sign similar.
Screen after signed successfully.
Click “View Process” button to return to Process screen
Click “View Record” button to return to transaction edit screen.
1.3. Create PO from Specific SA
In SA transaction > SA item, tick at column Is PO Request and click Submit to save.
At tab Related PO in SA, pick item and fill in Suppler ID, then click Create New PO.
The new purchase order is as follows
1.4. Create PO from Specific PR
Purchase orders can be created from purchase requisitions
At Purchase Requisition tab > subtab "Search Purchase Requisition", fill in the supplier ID, click Search, click Purchase Requisition ID to enter the editing screen.
In the purchase requisition editing screen, at tab Related PO Records, pick choose item, then click Create Purchase Order.
After checking, if you want to change the purchase order item no, select the purchase order item seq no in "New PO Item No". If you do not need to change it, leave it blank, and then click "Create Purchase Order". The system displays a success message.
After creating successfully, it will load the screen again and show new PO at Related PO. Click the purchase order ID to view the purchase order and details.
1.5. Draft Purchase Order
This tab to search purchase orders that have status = draft. Click Search button to search all transaction. Or fill conditions like Purchase Order ID, Supplier ID, … then click Search to find.
1.6. Active Purchase Order
This tab to search purchase orders that have status = active. Click Search button to search all transaction. Or fill conditions like Purchase Order ID, Supplier ID, … then click Search to find.
1.7. Search PO Item
This tab to search purchase order items with all statuses.
1.8. New PO from IQ Items
This tab is to select items from Inquiry Order and create new PO. Inquiry Order stastus = active.
Click icon to select Supplier to fill column New PO Supplier (Required)
Pick choose item and click Create PO button.
Confirm to create purchase order
Make sure the item is correct
Create successfully
After creating PO successfully, it will show new PO with item selected.
1.9. New PO from PR Items
This tab is to select items from Purchase Requisition transactions and create new PO.
Click icon to select Supplier to fill column New PO Supplier (Required)
Pick choose item and click Create PO button.
After creating PO successfully, it will show new PO with item selected.
In PO items will show source PR transactions.
1.10. New PO from SA Items
This tab is to select items from Sales Agreement transactions and create new PO. Click search or fill conditions: Order ID, Item No, Item Name,… then click search.
Pick choose item and fill in column “Supplier ID” (required), then click Create New PO button.
It will move to tab Draft Purchase Order, open the latest PO created.
In the editing screen, you can see selected items in PO Item.
1.11. New Outsource PO from MO Batch
This tab is used to select and create a new purchase order from the outsourcing process, pick choose items and click "ADD NEW PO" button.
The new PO will be shown in Draft Purchase Order tab. You can click to PO ID to go to editing screen to query the purchase items.
1.12. Update PO Item Price
This tab to update unit price for items in PO and PO status = active. You pick items in PO want to update, fill new amount in column “Unit Price”, then click Update button.
Update price for items successfully.
1.13. My Approval
This tab to show all transactions that have steps/ Action Name you can sign. Pick transaction need to sign. You can use Pick all button to tick at all boxes in column Pick.
Fill text for each column Conclusion (Required).
If you want to fill 1 content for all lines of Conclusion => use Conclude button.
Click sign button
2. MRP to PO
This tab is used to select items from MRP and create a new purchase order
2.1. PO Request
The first select tab MRP to PO, add search conditions to columns if you want and click button Search
On result search, you need input Supplier of row you want select and click Request Submit
Then create PO successfully, system will reload page, click search on tab “Draft Purchase Order” and you will see it in first row
Click at PO and system will give you to page edit PO.
2.2. PO Request by Plant
Add search conditions to columns if you want and click button Search.
On result search, you need to input Supplier of row you selected, adjust qty in column MRP to PO Qty, select PlantID and click Request Submit.
Then create PO successfully, system will reload page, click search on tab Draft Purchase Order and you will see it in first row.
2.3. Demand Detail
Fill Item No to search
System will show Item Demand Schedule, Item Demand Order, Item Stock, related SA, IM,… of this item
3. Inquiry Order
3.1. Create Inquiry Order
Select tab Inquiry Order. Click button Add New
On new screen. Choose magnifying glass
A small form appears. You can click search to see all supplier ID, then click Pick or you can input Supplier ID and then click Search to find faster.
When you have found the supplier ID you want, click Submit. When the completion process will create a new Inquiry
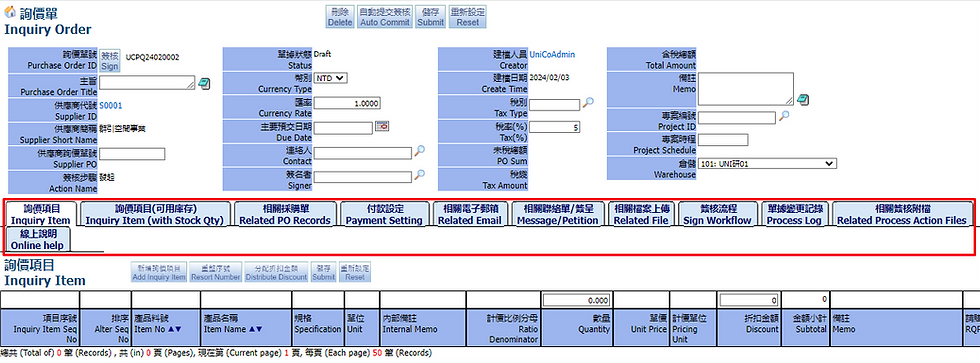
3.2. Inquiry Order Edit
At the top is buttons
+ Delete: to delete Inquiry Order
+ Auto commit: to auto sign PQ status to next step.
+ Submit: to save changes at the header.
+ Reset: to reset the value filled.
Below is the basic information about PQ: Purchase Order ID, Supplier ID, Action Name, Tax.... -> check all information and correct if necessary change.
The next section is Tabs to adjust -> will be detailed in the section below:
3.2.1. Inquiry Item
There are 5 buttons
1. Add Inquiry Item: to add items to PQ
2. Resort Number: to rearrange position of items.
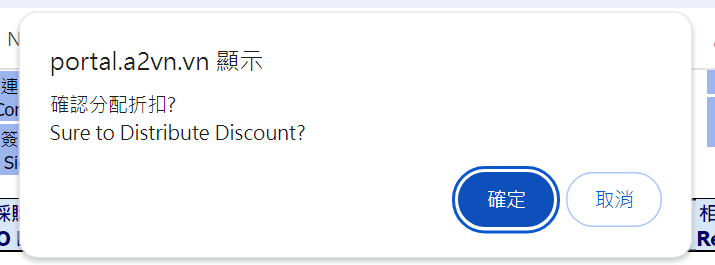
3. Distribute Discount: fill in total discount, items discount can be automatically allocated
4. Submit: to save changes after adjusting information in item.
5. Reset: to seret content filled in.
Add Inquiry items
Click “Add Inquiry Item” button, the following screen will be showed:
Rearrange position of items
Fill all seq no to colum “Alter Seq No” and click Submit. Then click "Resort Number" to rearrange.
Distribute Discount
Click button ”Distribute Discount”, the discount is automatically allocated to both items

Fill in total discount > ok
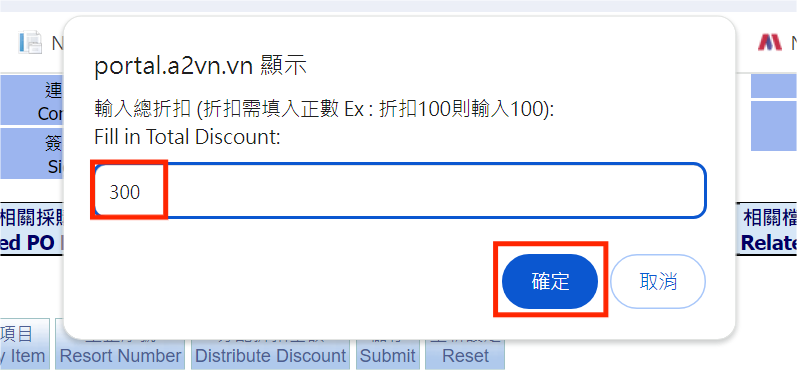
The discount is automatically allocated

3.2.2. Inquiry Item (with Stock Qty)
This tab is to show available stock of items added in PQ.
3.2.3. Related PO Records
This tab is to create PO from PQ items. You can click “Create PO Local Currency” or “Create Purchase Order” to create Purchase Order
For example : Pick item and click “Create Purchase Order”, the purchase order will be displayed on the ”Related PO”.
3.2.4. Payment Setting
This screen allows you to set up related payment settings.
3.2.5. Related Email
This screen displays related emails. You can also click “New Email” to create a new one.
3.2.6. Message/Petition
On this screen, you can view related messages/ petitions, and can click New Message/ New Petition to add them.
3.2.7. Related File
In this screen, you can upload related files, usually images or text files.
3.2.8. Sign Workflow
In this tab, you can view the approval process currently defined for this transaction type.
3.2.9. Process Log
In this screen, you can view the change records of this PQ transaction, which will record the change person, change time and change field.
3.2.10. Related Process Action Files
In this screen, you can view the attachment record of the approval form. If you need to attach files, you need to enter the approval form.
3.2.11. Online Help
On this screen, you can view online documents or help content. If you need to upload files, you need to enter the setting page of the approval process.
3.3. Draft Inquiry Order
This tab is to show all Inquiry order that has status = draft.
3.4. Active Inquiry Order
This tab is to show all Inquiry order that has status = active.
3.5. Search Inquiry Orders
This tab is to search all inquiry orders with all status. You can fill conditions as ID, status, Supplier name,…and click search button.
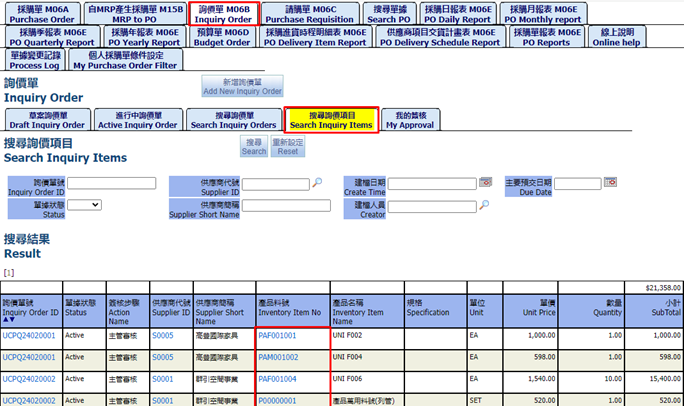
3.6. Search Inquiry Items
This tab is to search all items in inquiry orders. You can fill conditions as ID, status, Supplier name,.. and click search button.
3.7. My Approval
This tab to show all Inquiry orders that have steps/ Action Name you can sign. Pick choose transaction, select next step/ Route Name want to sign, fill content to Conclusion and then click Sign button.
4. Purchase Requisition
4.1. Create Purchase Requisition
Select tab Purchase Requisition and click Add New Purchase Requisition.
Similar to Create Inquiry Order, you need select Supplier ID and then click Submit.
When the completion process will create a new PR.
4.2. Create New PR Taxed Unit Price
The first, select tab Purchase Requisition and click Add New PR Taxed Unit Price.
You need select Supplier ID and select Item Default Tax Rate, then click Submit.
Create a new tax-included purchase requisition.
Purchase Requisition
At the top is buttons:submit and reset the value created
+ Delete: to delete PR
+ Auto commit: to auto sign PR status to next step.
+ Submit: to save changes at the header.
+ Reset: to reset the value filled.
Below is the basic information about PR: Purchase Requisition ID, Supplier ID, Action Name, Tax.... -> check all information and correct if necessary change.
The next section is Tabs to adjust -> will be detailed in the section below:
4.2.1. Purchase Requisition Item
There are 4 buttons
1. Add Purchase Requisition Item: to add items to PR
2. Resort Number: to rearrange position of items.
3. Submit: to save changes after adjusting information in item.
4. Reset: to seret content filled in.
Add items
Click “Add Purchase Requisition Item” button, the following screen will be showed:
Rearrange item seqno
4.2.2. PR Item (with Stock Qty)
This option is used to display the available inventory for the product item number in the Purchase Requisition Item
4.2.3. Print
To print the requisition report, select the report name > Search
4.2.4. Related PO Records
This option is used to create purchase orders from purchase requisition items
4.2.5. Related Inquiry Order Records
This tab is used to create Inquiry Orders from requisition items.
4.2.6. Payment Setting
This screen allows you to set up related payment settings.
4.2.7. Related Email
This screen displays related emails. You can also click "New Email" to create a new one.
4.2.8. Message/Petition
On this screen, you can query related contact orders/submissions, click New Message/ New Petition to add them.
4.2.9. Related File
In this screen, you can upload related files, usually images or text files.
4.2.10. Sign Workflow
In this screen, you can view the approval process currently defined for this document.
4.2.11. Process Log
In this screen, you can view the change record of this transaction, which will record the change person, change time and change field.
4.2.12. Related Process Action Files
In this screen, you can view the attachment record of the approval form. If you need to attach files, you need to enter the approval form.
4.2.13. Online Help
On this screen, you can view online documents or help content. If you need to upload files, you need to enter the setting page of the approval process.
4.3. Dratf Purchase Requisition
This tab is to show all requisitions that has status = draft.
4.4. Active Purchase Requisition
This tab is to show all requisitions that has status = active.
4.5. Search Purchase Requisition
This tab is to search all PR transactions with all status and types. You can fill conditions as ID, status, Supplier name,…and click search button.
4.6. Search Requested Item
This tab is to search all items in Purchase Requisition. You can fill conditions as Purchase Requisition ID, status, Supplier ID,.. and click search button
4.7. My Approval
This tab to show all PR transactions that have steps/ Action Name you can sign. Pick choose transaction, select next step/ Route Name want to sign, fill content to Conclusion and then click Sign button.
5. Create PO Receiving
Perform the following steps
In Purchase Order > Delivery Schedule, click "Receiving" button
Go to the company warehouse > Select Express PO Receiving Tab, enter PO ID in search fields to generate PI (PO Receiving), click the search button.
After having results, click into check box to pick and click on “Create PO ReceiveTrans”. After the document is generated, the newly added document will be found in tab “Draft Transactions”.
After selecting the purchase item, a receiving transaction is generated
After generation, the screen will switch to the Draft Transaction.
You can also create PO Receiving in the PO creation screen
This is a quick way to create a warehousing order at the bottom of the purchase order purchase schedule. After the generation is completed, you can see the Inventory Transaction is quickly created below. You need to make sure that the purchase order has been signed to the active status.
Click on the PI ID , will open the PI edit screen
Like the PO screen (and others), we have parts. At the top is the delete purchase receipt order, save the changes, reset the value created.
Below is the basic information about PI: item no, warehouse code, supplier code, status, commit time and etc. You check all information and correct if necessary change.
Return to the purchase order screen, click the "PO Item" tab, and look down at the Inventory Transaction part. You will find the purchase warehousing document generated for the purchase order.
6. Create PO Return
First, go to the purchase order screen to add, can create new PO return in Inventory Transaction
System display New Inventory Transaction Adjust (PO Return) screen. When adding a document, you need to choose Setting: Returning, Reship and NoReship, then click Submit
Note:
+ Returning: goods are returning
+ ReShip: return goods, then supplier will reship goods
+ NoReship: return goods, but the supplier will not reship goods
Then open purchase return order with subtype POReturn. Click InventoryJournal Plan tab and then you click “Add PO Return Item” button
Click button Search to find items of PO, then Pick item need return and click Submit
Fill the quantity you want to return into column “Adjust Quantity”, for example with Item PAM001001, Input quantity = 2. Then click button caculate into column “Net Weight(Kg)” to recalculate and Click Submit
Sign PO Return until Closed
7. Search PO
This tab is to search PO types: purchase order, purchase requisition, purchase items.
7.1. Search PO
This subtab is to search PO transactions with all sub types and status. You can fill in conditions as Purchase ID, SupplierID, Supplier Name,… and click Search button.
7.2. Search PO Item
This subtab is to search items relate to PO transactions. You can fill in conditions as Purchase ID, SupplierID, Supplier Name,…and click Search button.
7.3. PO Delivery Schedule Item
This tab is to search items in PO transactions and these items created delivery schedule.
7.4. PO Delivery Item Schedule
This tab is to search PO transactions created delivery schedules.
8. PO report
8.1. PO Daily Report
This subtabs to search taxed subtotal of POs by date. Enter your search condition to get the result you need.
Date
For example, you want to find amount of Supplier ID is S0001 and Purchase Date from 2024/02/01 to 2024/02/03. It will show taxed local total of S0001’s POs from 2024/02/01 to 2024/02/03.
Tab “Supplier” and tab “Date, Supplier” tab is similar to tab Date.
Date, Supplier
This subtabs to search taxed subtotal of POs by date and shows more detail by what Supplier.
Supplier
This subtabs to search taxed subtotal of POs by Supplier.
8.2. PO Monthly report
Select tab PO Monthly Report. For example, you want to find Year is 2024 and Month is 1. The result will show all amount of days in January and the total amount. If you want to find more accurate, please add search conditions.
8.3. PO Quarterly Report
Similar to PO Daily Report and PO Monthly report.
Supplier
The result will show taxed total of quarters in selected year and the total amount by supplier.
PO ID
The result will show taxed total of quarters in selected year and the total amount by Purchase Order ID.
8.4. PO Yearly Report
Select tab PO Yearly Report. Similar to PO Daily Report and PO Monthly report. But in the year you search (including 12 months)
Supplier
The result will show taxed total of months in selected year and the total amount by supplier.
PO ID
The result will show taxed total of months in selected year and the total amount by Purchase Order ID.
8.5. PO Delivery Item Report
Select tab PO Delivery Item Report. Enter your search condition to get the result you need. For example, you want to find Supplier ID is S0001 and Due Date from 2024/01/01 to 2024/02/03. You can add conditions to find more accurately.
8.6. PO Delivery Schedule Report
Select tab PO Delivery Schedule Report. Enter “Year” to search you need.
8.7. PO Reports
8.7.1. PO Item Reports
This subtab is to print report with items in PO, PO type = manual.
8.7.2. PO Outsource Items Report
This subtab is to print report with items in PO, PO type = Outsource.
9. Budget Order
9.1. Add New Budget Order
Select the "Budget Order" tab and click Add New Budget
You can click the magnifying glass to select the project ID, and click Submit when finished.
After adding, it will enter the budget order editing screen.
9.2. Budget Order Edit
There are 3 buttons at the top of the editing screen
+ Delete: to delete Order
+ Submit: to save changes after adjusting information in header.
+ Reset: to seset content filled in.
9.2.1. Budget Order Item
Add items
Click “Add New Items” button, the following screen will be showed.
Pick choose items and fill in the quantity, click Submit Items to add
The screen after adding is as follows
Rearrange item seqno
Fill in Alter SeqNo > Submit > Click “SortNo” button
The completed screen is arranged as follows
9.2.2. PO Budget Change
Pick choose items in Budget Order Item, fill in the quantity and click Change Budget
9.2.3. PR/PO Items
This screen allows you to query requisition/ purchase items
Or fill in the supplier ID, select Items, and click "Create PO" button
The following is the screen for adding new purchasing items.
9.2.4. AP/PA Records
This tab is to query related payable/payment records
9.2.5. Related Files
In this screen, you can upload related files, usually images or text files.
9.2.6. Sign Process
In this screen, you can view the approval process currently defined for this transaction type.
9.2.7. Statement
This screen allows you to view the description text of the system reminder.
9.2.8. Online Help
On this screen, you can view online documents or help content. If you need to upload files, you need to enter the setting page of the approval process.
9.3. Add New Budget Change
Select the "Budget Order" tab and click Add New Budget Change to change the budget. Fill in Project ID > Submit.
Enter the editing screen after create new document.
9.4. Budget Change Edit
There are 3 buttons at the top of the editing screen
+ Delete: to delete Order
+ Submit: to save changes after adjusting header data.
+ Reset: to seset content filled in.
9.4.1. Budget Order Item
Click "Add New Item" to add a budget items
The " Find inventory item" screen appears. Select items and fill in the quantity, then click "Submit Items"
You can see the newly added budget items
9.4.2. Related PO Item
In this screen, you can query related purchasing items, or after filling in the supplier ID and selecting items, click Create PO to create new purchase order
9.4.3. AP Records
Can view related accounts payable.
9.4.4. Related Files
In this screen, you can upload related files, usually images or text files.
9.4.5. Sign Process
In this screen, you can view the approval process currently defined for this document.
9.4.6. Statement
This screen allows you to view the description text of the system reminder.
9.4.7. Online Help
On this screen, you can view online documents or help content. If you need to upload files, you need to enter the setting page of the approval process.
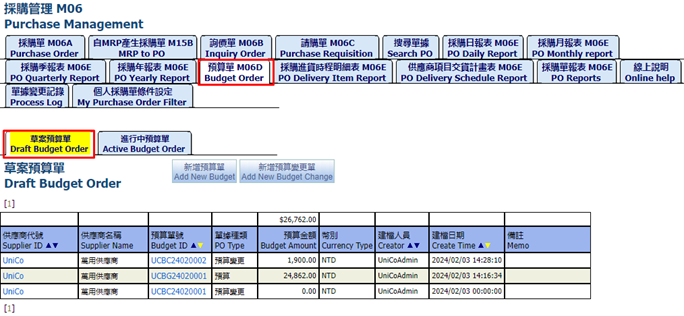
9.5. Draft Budget Order
This tab is used to display all budget orders with status = Draft.
9.6. Active Budget Order
This tab is used to display all budget orders with status = Active.
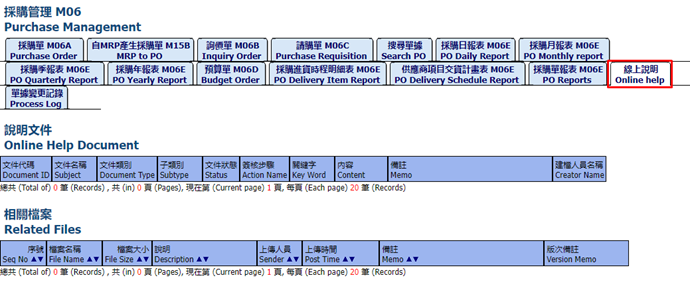
10. Online help
On this screen, you can view online documents or help content. If you need to upload files, you need to enter the setting page of the purchase approval process.
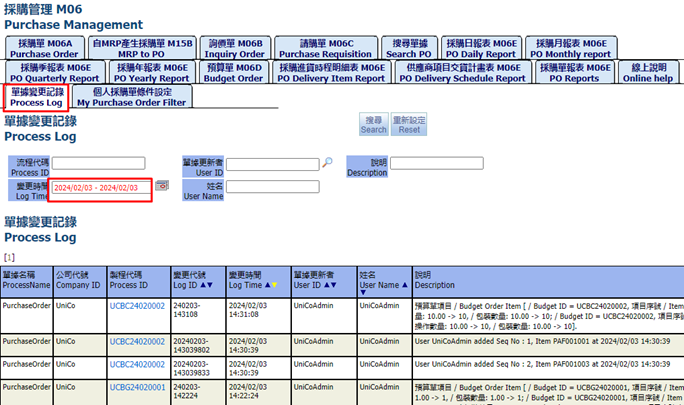
11. Process Log
In this screen, you can view the change records of this transaction, which will record the change person, change time and change field.
12. My Purchase Order Filter
End.


