
Receivable Management
- Jun 11, 2024
- 11 min read
Updated: Sep 19, 2024
Home page => Operation => Account Receivable => UI Account Receivable Management
Click Account Receivables from the operation menu to enter the Account Receivables management screen.

1. Create ARs
This screen can automatically transfer from upstream documents to account receivable according to different purposes. There are several ways:

1.1. SO Shipping to ARs – Create AR from SD
The purpose of this screen to create new Account Receivable from SA Shipping
UI Account Receivables Management => Tab Create ARs => Subtab SO Shipping to ARs
Choose SDs and input AR Amount => Pick Add to ARs
Converting SO Shipping to receivables means receivables arising from the sale of items. After searching for shipping orders, select the shipping order for which receivables need to be generated this time and click to generate new account receivables.

The system will combine the defaults by customer and shipping date. If you need to exclude date conditions, you can choose different methods.
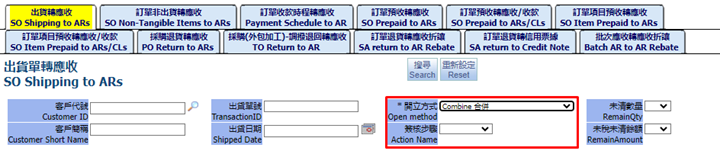
After created new Account Receivable, the screen will automatically switch to a draft account receivable. In the search results, you can see the recently generated account receivable with the status of draft.

1.2. SO Non-Tangible Items to ARs – Create AR Service from SA
The purpose of this screen to create new Account Receivable from SA Service
UI Account Receivables Management => Tab Create ARs => Subtab SO Non-Tangible Items to ARs=> Choose SA Service or fill in Input AR Amount => Pick Add to ARs
The order is converted from SO Non-Tangible Items to receivables, which means that the order is for items that are not managed from inbound and outbound warehouses, such as service items, universal items and other items that have been expensed. After the order item is checked in the search results, new A/R document is generated.

After created new Account receivable, the screen will automatically switch to a draft account receivable. In the search results, you can see the recently generated account receivable with the status of draft.

1.3. Payment Schedule to AR – Create AR from Order Payment Schedule

1.4. SO Prepaid to ARs – Create AR from SA Prepaid

1.5. SO Prepaid to ARs/CLs – Create AR/CL from SA Prepaid

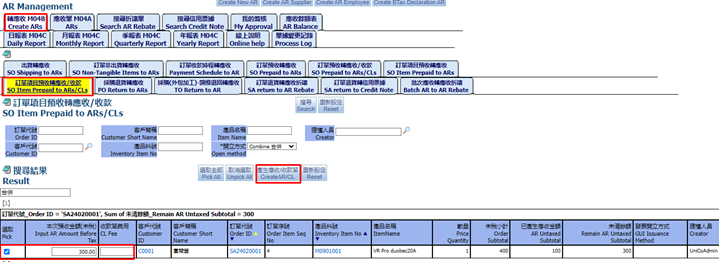
1.6. SO Item Prepaid to ARs– Create AR from SA Item Prepaid

1.7. SO Item Prepaid to ARs/CLs – Create AR/CL from SA Item Prepaid
1.8. PO Return to ARs – Create AR from PO Return
The purpose of this screen to create new Account Receivable from PO Return
UI Account Receivables Management => Tab Create ARs => Subtab PO Return to ARs => Choose PO Return => Pick Add to ARs
The conversion of purchase returns to receivables means that the purpose is to request payment from the other party due to the purchase return. This situation is also listed as a type of receivables. After selecting the return order in the search results, new account receivables is generated

After created new Account Receivable, the screen will automatically switch to a draft receivable. In the search results, you can see the recently generated account receivable with the status of draft

1.9. TO Return to AR
Go to AR Management, click on “TO return to AR” tab and click “Search”. All the TO return will be shown. We choose TO return and then press “Add to ARs” button.
Procurement (outsourcing processing) - The nature of the return is similar as purchase return, but because the item of the purchase order is an expense item (not an inbound and outbound warehouse), it is necessary to generate account receivable based on the transfer return record of the original production order. In the search results, choose the transfer return document to generate new account receivable

1.10. SA return to AR Rebate
Go to AR Management, click on “SA return to AR Rebate” tab and click “Search”. All the SA Return will be shown.
SA return allows you to quickly generate AR Rebate based on the order's return record.

After selecting the SA return in the search results, select the A/R that needs discount this time and press “Add new AR Rebate” button to create an A/R rebate. The A/R can use the magnifying glass to search for the A/R generated by the original shipping order. If the payment collection or reversal has been completed, it cannot be selected anymore. You need to select another account receivable of the same customer.

After created success, the screen will automatically go to the search AR Rebate. You can search for the receivable discount just generated in the draft AR Rebate.

1.11. SA return to Credit Note
Go to AR Management, click on “SA return to Credit Note” tab and click “Search”. All the SA return will be shown. We choose SA return and then press “Add new Credit Note” button.
The order return to credit note can quickly generate customer credit notes based on the return record of the order.
The reason may be that there are no discountable receivables, so a credit note record is generated to promise that the customer can use it as a deduction record for future receivables.

After created, the screen will automatically switch to search Credit notes. You can search for the Credit notes just generated in the draft Credit notes.

1.12. Batch AR to AR Rebate
Go to AR Management, click on “Batch AR to AR Rebate” tab. Then fill in all required information as: Taxed Rebate Amount, CPayment Item Type, Invoice Date, Customer ID, Currency Type. We choose AR and then press “Transfer Picked Item” button,
This page can quickly generate receivable discounts for customers. After filling in the total amount of this discount in the conditions, after checking the receivable document in the search results, the system will automatically allocate the receivable items until all allocation is completed. The default Distribution starts based on the largest remaining amount of receivables. Therefore, the receivables note needs to check a ratio that is greater than the total amount entered, otherwise the distribution may not be complete.


After created, the screen will switch to the search AR Rebate. You can see the AR Rebate just generated in the draft AR Rebate.

1.13. Create New AR
The purpose of this button to create new Customer Account Receivable, instead of automatically transferring it from a certain document. Press to add a new customer account receivable.
UI Account Receivables Management => Click button Create New AR

After click Create New AR you will see the full screen following

You need to use the magnifying glass to select the customer, and the default fields such as currency, tax rate and other information will be automatically brought in. After completion, click Save to create a new customer account receivable.

1.14. Create AR Supplier
The purpose of this button to create new Account Receivable Supplier
UI Account Receivables Management => Click button Create AR Supplier

After click Create AR Supplier you will see the full screen following:

You need to use the magnifying glass to select the supplier, and the default fields such as currency, tax rate and other information will be automatically brought in. After completion, click Add A/R to generate new supplier A/R.

1.15. Create AR Employee
The purpose of this button to create new Account Receivable Employee
UI Account Receivables Management => Click button Create AR Employee

After click Create AR Employee you will see the full screen following

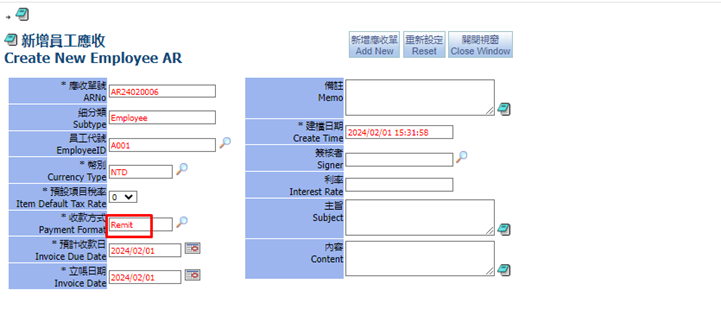
You can use the magnifying glass to search for the employee code, enter the tax rate, payment method, invoice date and other information and click Add A/R to generate a new employee A/R.

1.16. Create BTax Declaration AR
The purpose of this button to create new Account Receivable for business tax declaration. Therefore, the document is a special receivable. The current normal operation mode is to automatically generate the declaration data from the invoice module. It can also be generated manually here.
UI Account Receivables Management => Click button Create BTax Declaration AR

After click Create BTax Declaration AR, the newly added screen opens, select the tax period (the period must be completed first) and click Save.

Choose Tax Period and click “Submit” then you will see the screen below
After create, the screen will open to edit the business tax declaration receivable.

Items can be added by adding items. If it is automatically generated from the invoice module, there is no need to add items.

Automatically generated will be automatically brought into the project based on the declaration results.

2. AR Edit
After create successfully AR, on the top of this screen, you see some buttons as Delete, Auto Approve, Update Currency Difference, Submit, Reset

For AR type: AR Manual, AR Supplier and AR Employee, it uses the same screen. Just Subtype is different

Click button Delete at the top for deleting documents, a save button for save single information at header after adjusting, and an update exchange rate difference button that is used to calculate exchange gains and losses during reversal. Manual selection is usually not required. There is also an automatic approval button that can be used with one click. Sign off to next step
2.1. AR Items
At AR Items screen, have 1 button “Add New Multiple AR Item” to add AR Items
In the receivable information, you can view the items receivable this time, including quantity, unit price, subtotal, etc. If the receivable order is a previous order, the item content will be automatically brought in. If you need to add additional items, you need to click Add Items receivable

There are several ways to add receivable items. The first one is based on the content set in the voucher setting, such as the expense type, and you can also select the source ID, select and enter the amount and submit it.

The second method is you can add AR Items from intangible SA items. Because sometimes it is necessary to combine shipping and non-shipping items into the same receivables, usually a shipping receivable document will be generated first and then the non-shipping items will be replenished.

After add successfully, return to AR Items screen to see added items

2.2. Print
You can select the report name to print in this tab

Click Print in the lower left corner and select the print file, such as PDF or Excel...etc.
> Confirm to print and click export.

2.3. Invoice Information
In this tab you can see related information and create customer invoice. . You can semi-automatically generate receivable invoices or use quick generation invoices. After generation, click on the invoice for editing.

2.4. Collection Record
In this tab you can see related collection records or discount order record of the receivable note.

2.5. AR Item Write Off
In this tab you can see related write off records of precollection
In this screen, you can perform reversal operations on receivable documents, and you can reverse advance receipts and temporary receipts.

2.6. Voucher Record
In this tab you can see related voucher and create voucher. After clicking Add voucher, you will be transferred to voucher management to quickly generate voucher.

2.7. Related Email
This screen shows related Email,
New Mail: this button is used to create related Mail for AR

2.8. Message/Petition
This screen shows related Message/Petition,
New Message/ New Petition: these buttons are used to create related Message/Petition for AR

2.9. Related file
In this tab you can upload the file if need, usually images or text files.

2.10. Workflow
In this screen, you can view the approval process currently defined for this document.

2.11. Process Log
This screen shows the change record of this document, which will record the change person, change time and change field.

2.12. Currency Conversion
This tab used to change currency. Choose Currency and Click Submit to change.
After changing the currency, the exchange rate will be automatically converted.

2.13. Update Closed AR
In this tab you can change the Memo, Voucher Memo, Subject and Content related fields when AR closed
The content can be modified on this screen. The content cannot be changed when the document status is closed. However, some remark fields can be changed here without affecting important data.

2.14. Comment Detail
In this screen, you can view the comment detail of some fields.

2.15. PackingList & Invoice
This screen displays related packaging list and invoice of the shipping order from abroad.
For details, please see Order Managemen N0.7.16. PackingList & Invoice

2.16. Related Process Action Files
In this screen, you can view the attachment records of the approval form. If you need to attach files, you need to enter the approval form.

2.17. Online help
On this screen, you can view online documentation or online help content. If you need to upload files, you need to enter the setting page of the approval process.

2.18. Description
This screen allows you to view the description text of the system reminder.

3. ARs
The purpose of this screen to search all Account Receivables follow user’s request. UI Account Receivables Management => Tab Search ARs => Choose Subtab Draft ARs, Active ARs, Uncleared ARs, Search ARs, Search AR Items
3.1. Draft ARs
The purpose of this screen to search Draft Account Receivables.
UI Account Receivables Management => Tab ARs => Subtab Draft ARs.

3.2. Active ARs
The purpose of this screen to search Active Account Receivables.
UI Account Receivables Management => Tab ARs => Subtab Active ARs.

3.3. Uncleared ARs
The purpose of this screen to search for receivables that have not yet completed collection or reversal.
UI Account Receivables Management => Tab ARs => Subtab Uncleared ARs.

3.4. Search ARs
The purpose of this screen to search for receivables in all statuses.
UI Account Receivables Management => Tab ARs => Subtab Search ARs.

3.5. Search AR Items
The purpose of this screen to search the contents of receivable items for all status.
UI Account Receivables Management => Tab ARs => Subtab Search AR Items.

4. Search AR Rebate
This screen shows all AR Rebate with different purpose
4.1. Draft AR Rebate
Search Draft AR Rebate: Show all draft AR Rebate

4.2. Active AR Rebate
Search Active AR Rebate: Show all active AR Rebate

4.3. Search AR Rebate
Search AR Rebate: Show all AR Rebate

5. Search Credit Note
This screen shows all Credit Note with different purpose
5.1. Draft Credit Note
Search Draft Credit Note: Show all draft Credit Note

5.2. Active Credit Note
Search Active Credit Note: Show all active Credit Note

5.3. Search Credit Note
Search Credit Note: Show all Credit Note

6. My Approval
This screen shows all ARs were created by yourself to sign

7. AR Balance
The AR balance table is for querying the receivable status at each point in time. The following query tables are available according to different purposes.

7.1. AR Balance
This AR balance report will search the balance of the receivable based on the date of end date.

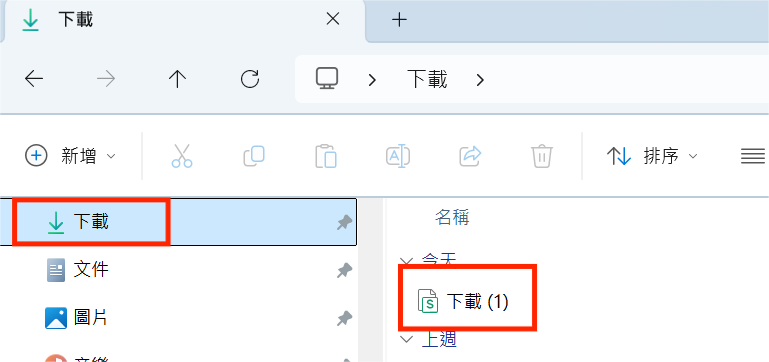
Click "Export to Excel" to export the “Results” as an Excel file

Go to PC, file "Download"to open the Excel file

7.2. AR Balance by Target ID
This report will search the receivable balance of the transaction object based on the date of end date.

7.3. AR Item Balance
This report will search the balance of receivable items based on the date of end date.

Click "Export to Excel" to export the “Results” as an Excel file
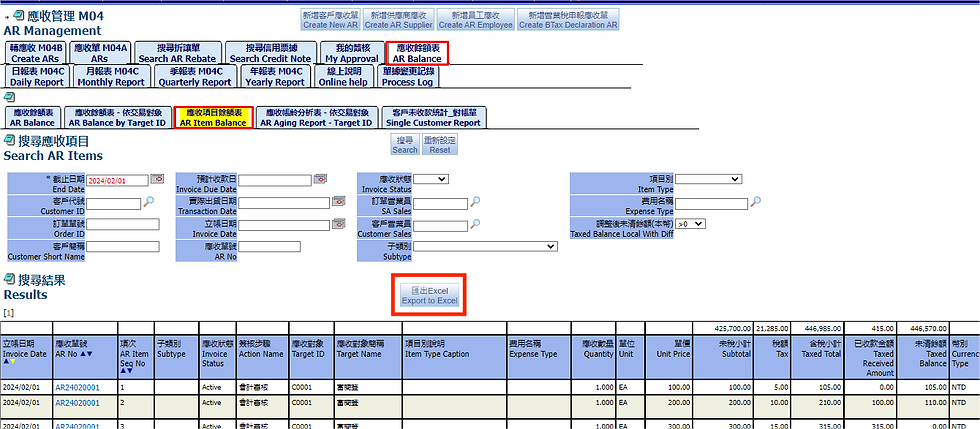
Go to PC, file "Download"to open the Excel file


7.4. AR Aging Report - Target ID
This report will search AR aging days by AR, we can search the distribution status of the outstanding receivable amount of the transaction object in different days range according to the transaction object and the statistical end date

7.5. Single Customer Report
This report shows the remain amount of customer and recently payment date, we can search by any start date and end date
This screen is for printing uncollected payments from each customer for reconciliation.

8. AR Reports
The receivables statistics table is a report that counts the currently generated receivables based on different analysis methods. Therefore, it has very flexible rules. Each report is introduced below:
8.1. Daily Report
The purpose of these reports to search data relate to Account Receivable for daily
UI Account Receivables Management => Tab Daily Reports => Choose Daily reports AR for Date, Date Customer, Customer:
Daily report statistical results are based on the receivable date as the search range, and the results are divided into different consolidation methods.
8.1.1. Date
Combined by date, display daily receivable amount

8.1.2. Date, Customer
Combined by date and customer, display the daily amount receivable from the customer

8.1.3. Customer
Combined by customer, display the amount receivable for each customer

8.2. Monthly Report
The purpose of these reports to search data relate to Account Receivable for monthly
UI Account Receivables Management => Tab Monthly Report => Choose Monthly report Group by Target ID
The statistical results of the monthly report are based on the receivable date as the search range. The results display the daily receivable amount of the month. The presentation method is fixed on 31 dates.

8.3. Quarterly Report
The purpose of these reports to search data relate to Account Receivable for quarterly
UI Account Receivables Management => Tab Quarterly Report => Choose Quarterly report Group by Target ID
The statistical results of quarterly statements are based on the receivable date as the search range. The results show the amount receivable for each quarter of the year. The presentation method is fixed for 4 quarters.

8.4. Yearly Report
The purpose of these reports to search data relate to Account Receivable for yearly
UI Account Receivables Management => Tab Yearly Report => Choose Yearly report Group by Target ID
The annual report statistical results are based on the receivable date as the search range. The results display the monthly receivable amount of the year, and the presentation method is fixed for 12 months.

9. Online help
On this screen, you can view online documentation or help content. If you need to upload files, you need to enter the setting page of the approval process.

10. Process Log
In this screen, you can view the change records of all receivable orders. The change person, change time and change field will be recorded.

End.